2-1 Web Application with EFS Blueprint
This exercise shows how Cloudsoft AMP helps address the management of applications. We will deploy a three-tier application consisting of:
- An elastic load balancer
- An auto-scaling group running
httpd - A shared file system containing the content served by
httpdwith a bastion server for accessing it
You will learn how AMP extends common infrastructure-as-code patterns to deliver “environment-as-code”, reusable blueprints that encompass in-life concerns including CI/CD, compliance, hybrid IT, and resilience.
This exercise will take about an hour and will require an S3 bucket to use as the Terraform state store, such as the bucket created in Exercise 1. If you use TFC/TFE or another backend, that can normally be specified either in the AMP blueprint or in the Terraform, but for simplicity these demo exercises are standardized to use a configurable S3 bucket name as the terraform backend.
Deploying the Application
To deploy, we could copy and paste the blueprint into the Composer, but instead let’s introduce the “Catalog”. This is a repository within AMP which can store blueprints and other types for re-use. These can be deployed directly, embedded in larger blueprints, or opened “expanded” for editing in the Composer prior to deployment.
Open the “Catalog” in AMP using the top-right module navigation button. Click on “Types” and search for “Exercise 2-1”.
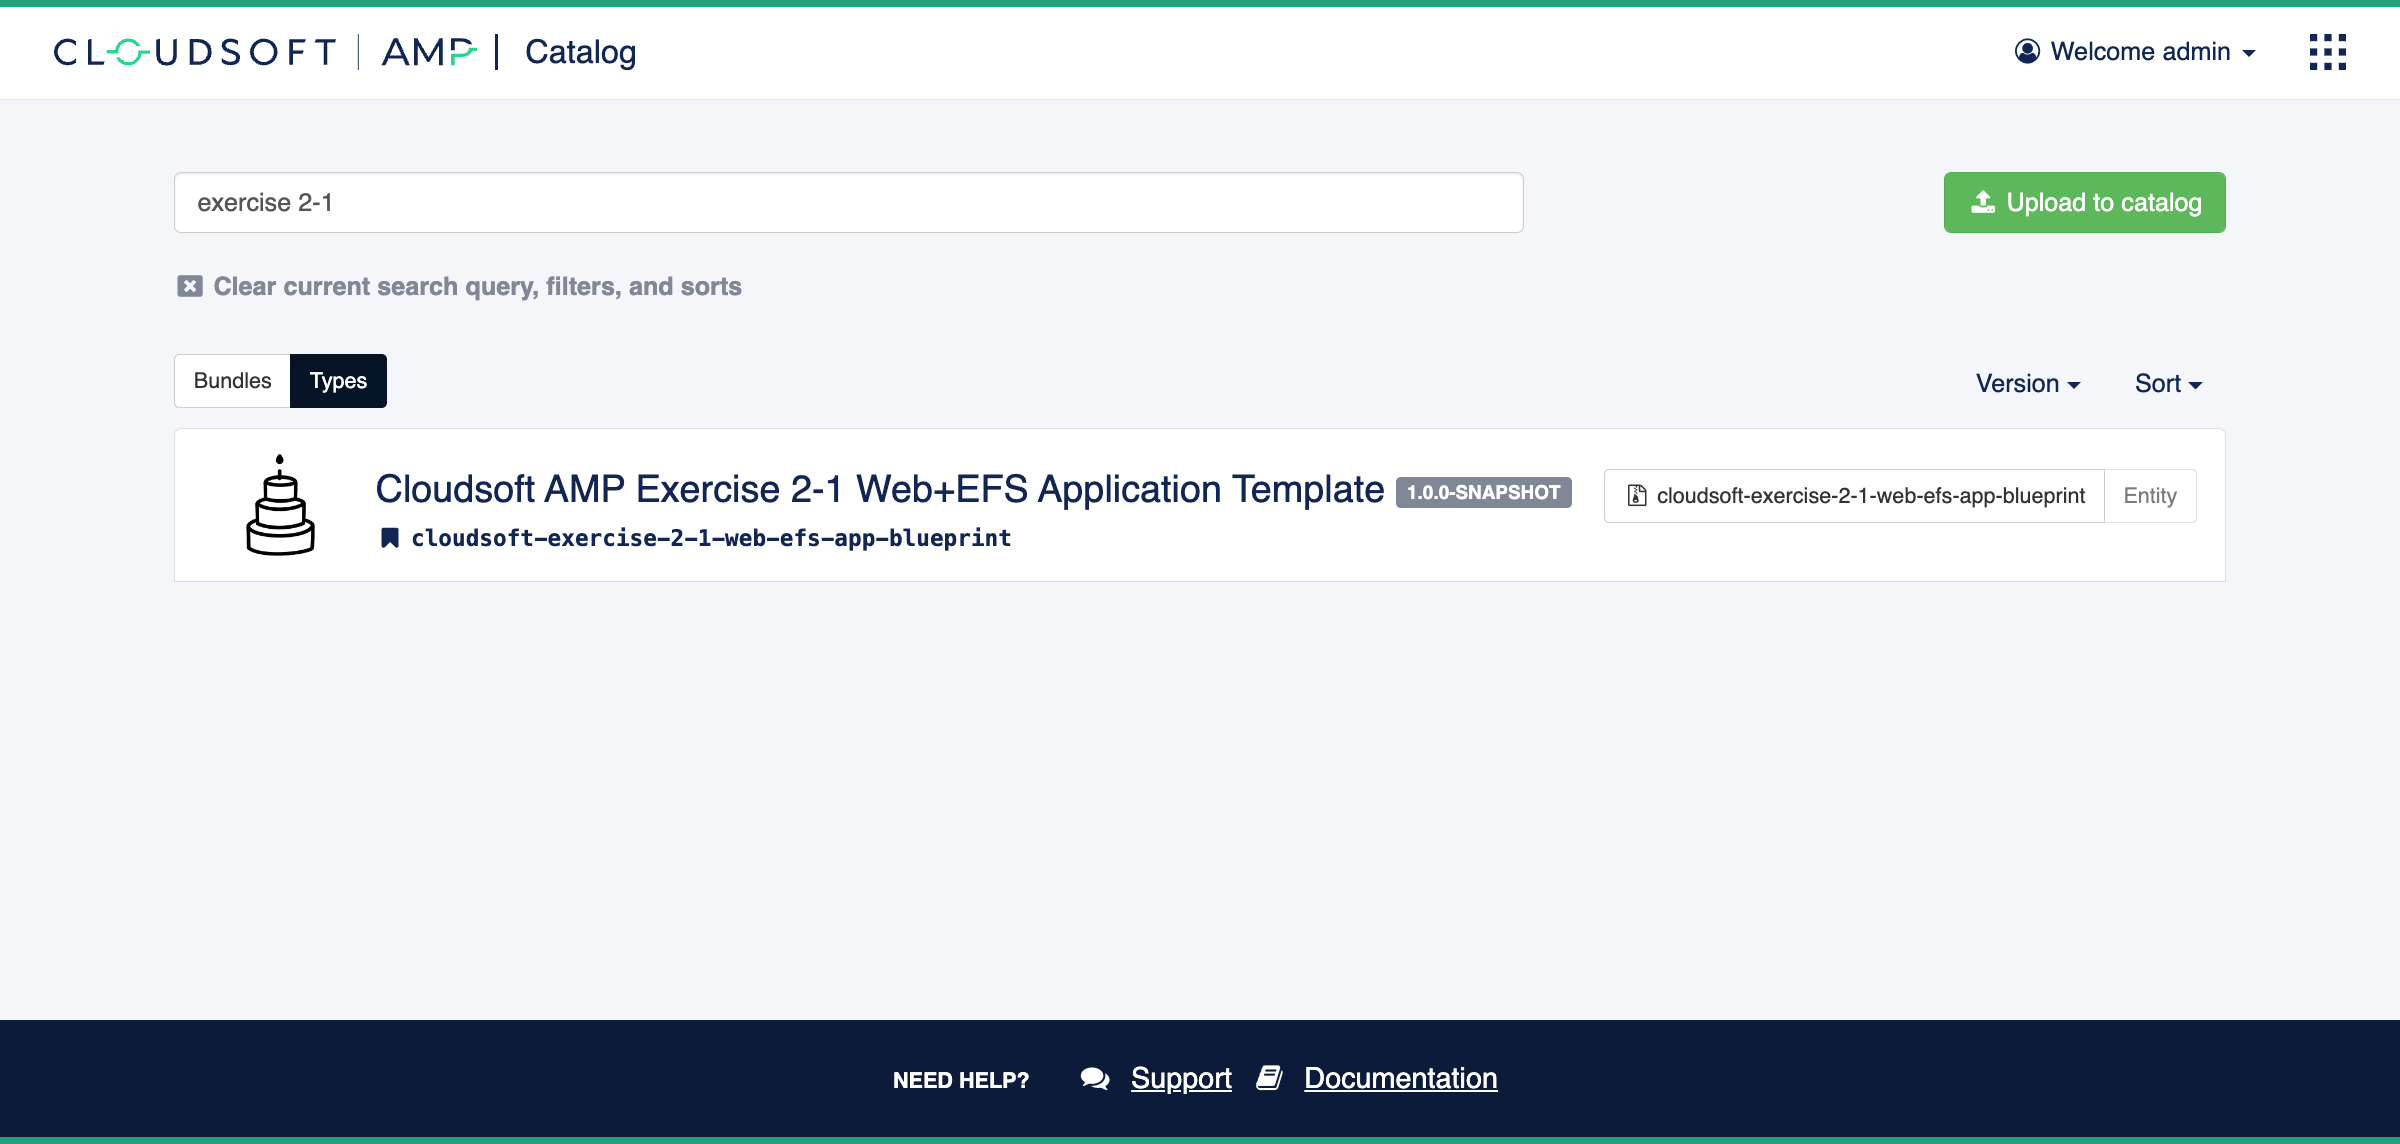
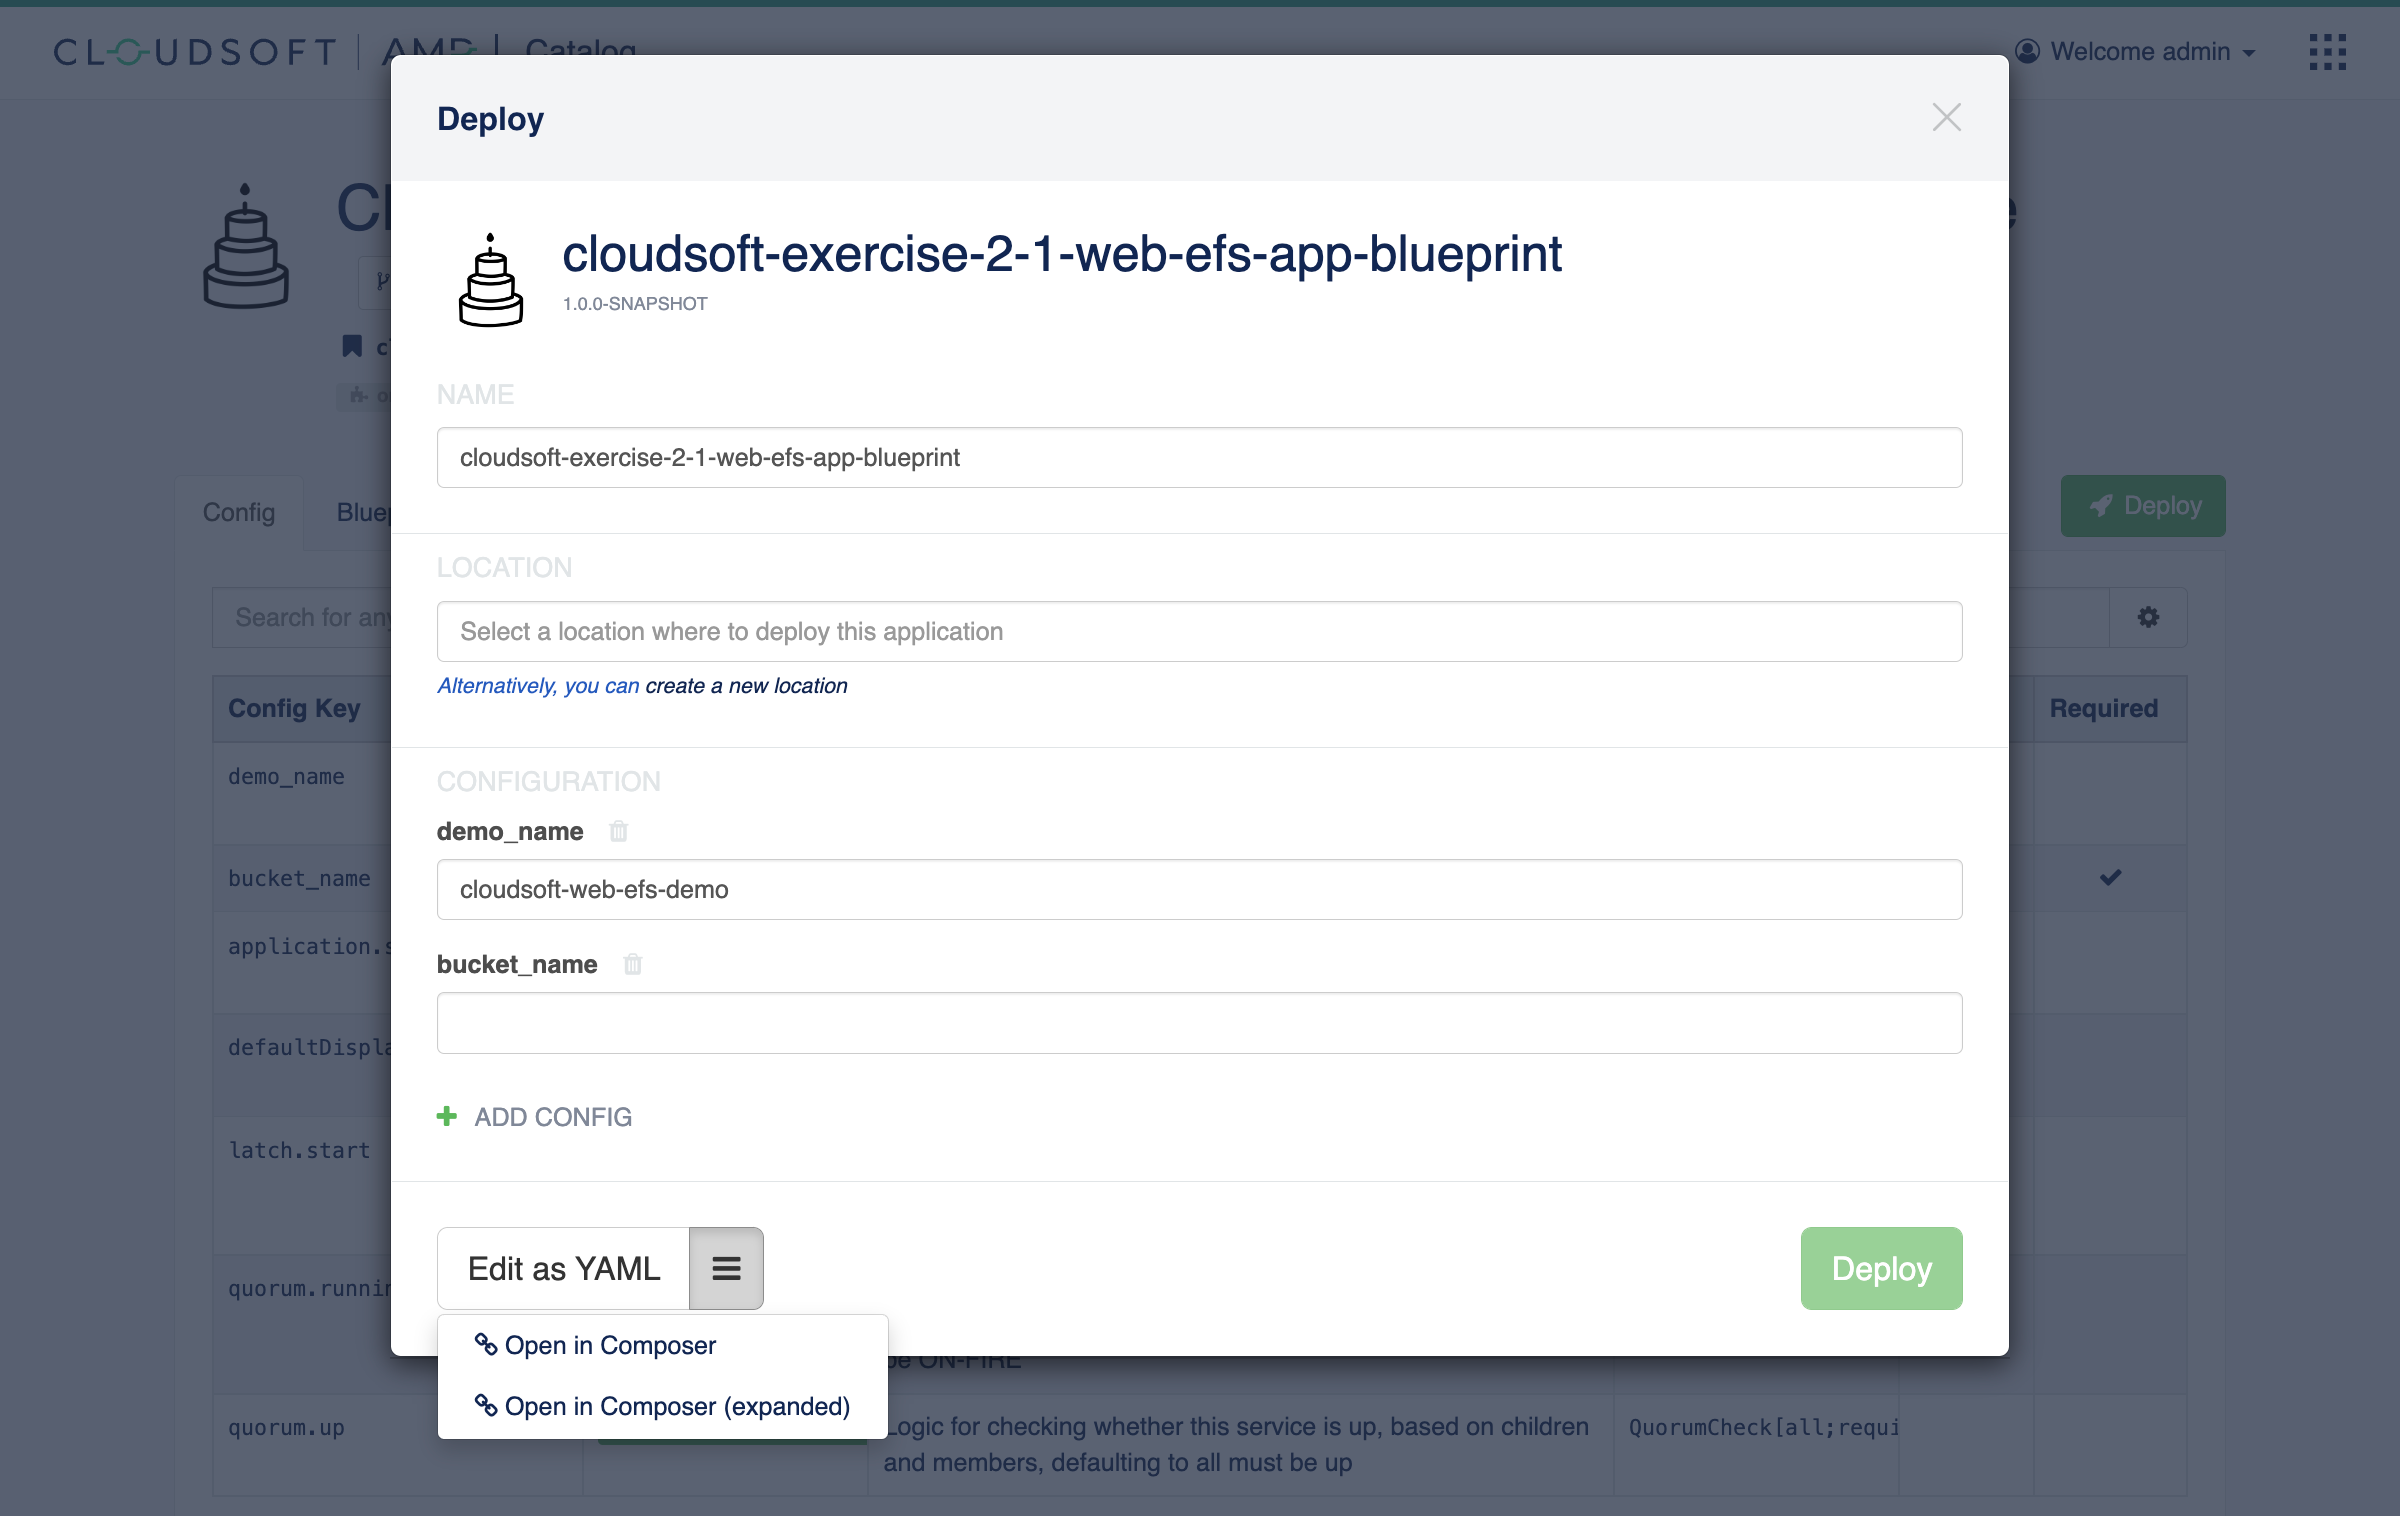
This should have one match, which you can click on to open to see its details, including the blueprint and the parameters it expects. There is also an option to “Deploy” this type; click this, and then click the three-lines button at the bottom of the pop-up to “Open in Composer (Expanded)”.
 Installing manually
⌃
 “Open” vs “Open (Expanded)”
⌃
The “Open (Expanded)” action will open the Graphical Composer with this blueprint expanded. This time, there will be three circles underneath the oval, two representing the web tier and the EFS tier, and the third managing the website content installed onto the EFS tier and served by the web tier.
There is one error with our blueprint, indicated in the bottom left and by the red outline on the oval.
Click on the oval or expand the error indicator to focus on the error:
this blueprint definition indicated that bucket_name is required, and here we have not yet provided a value.
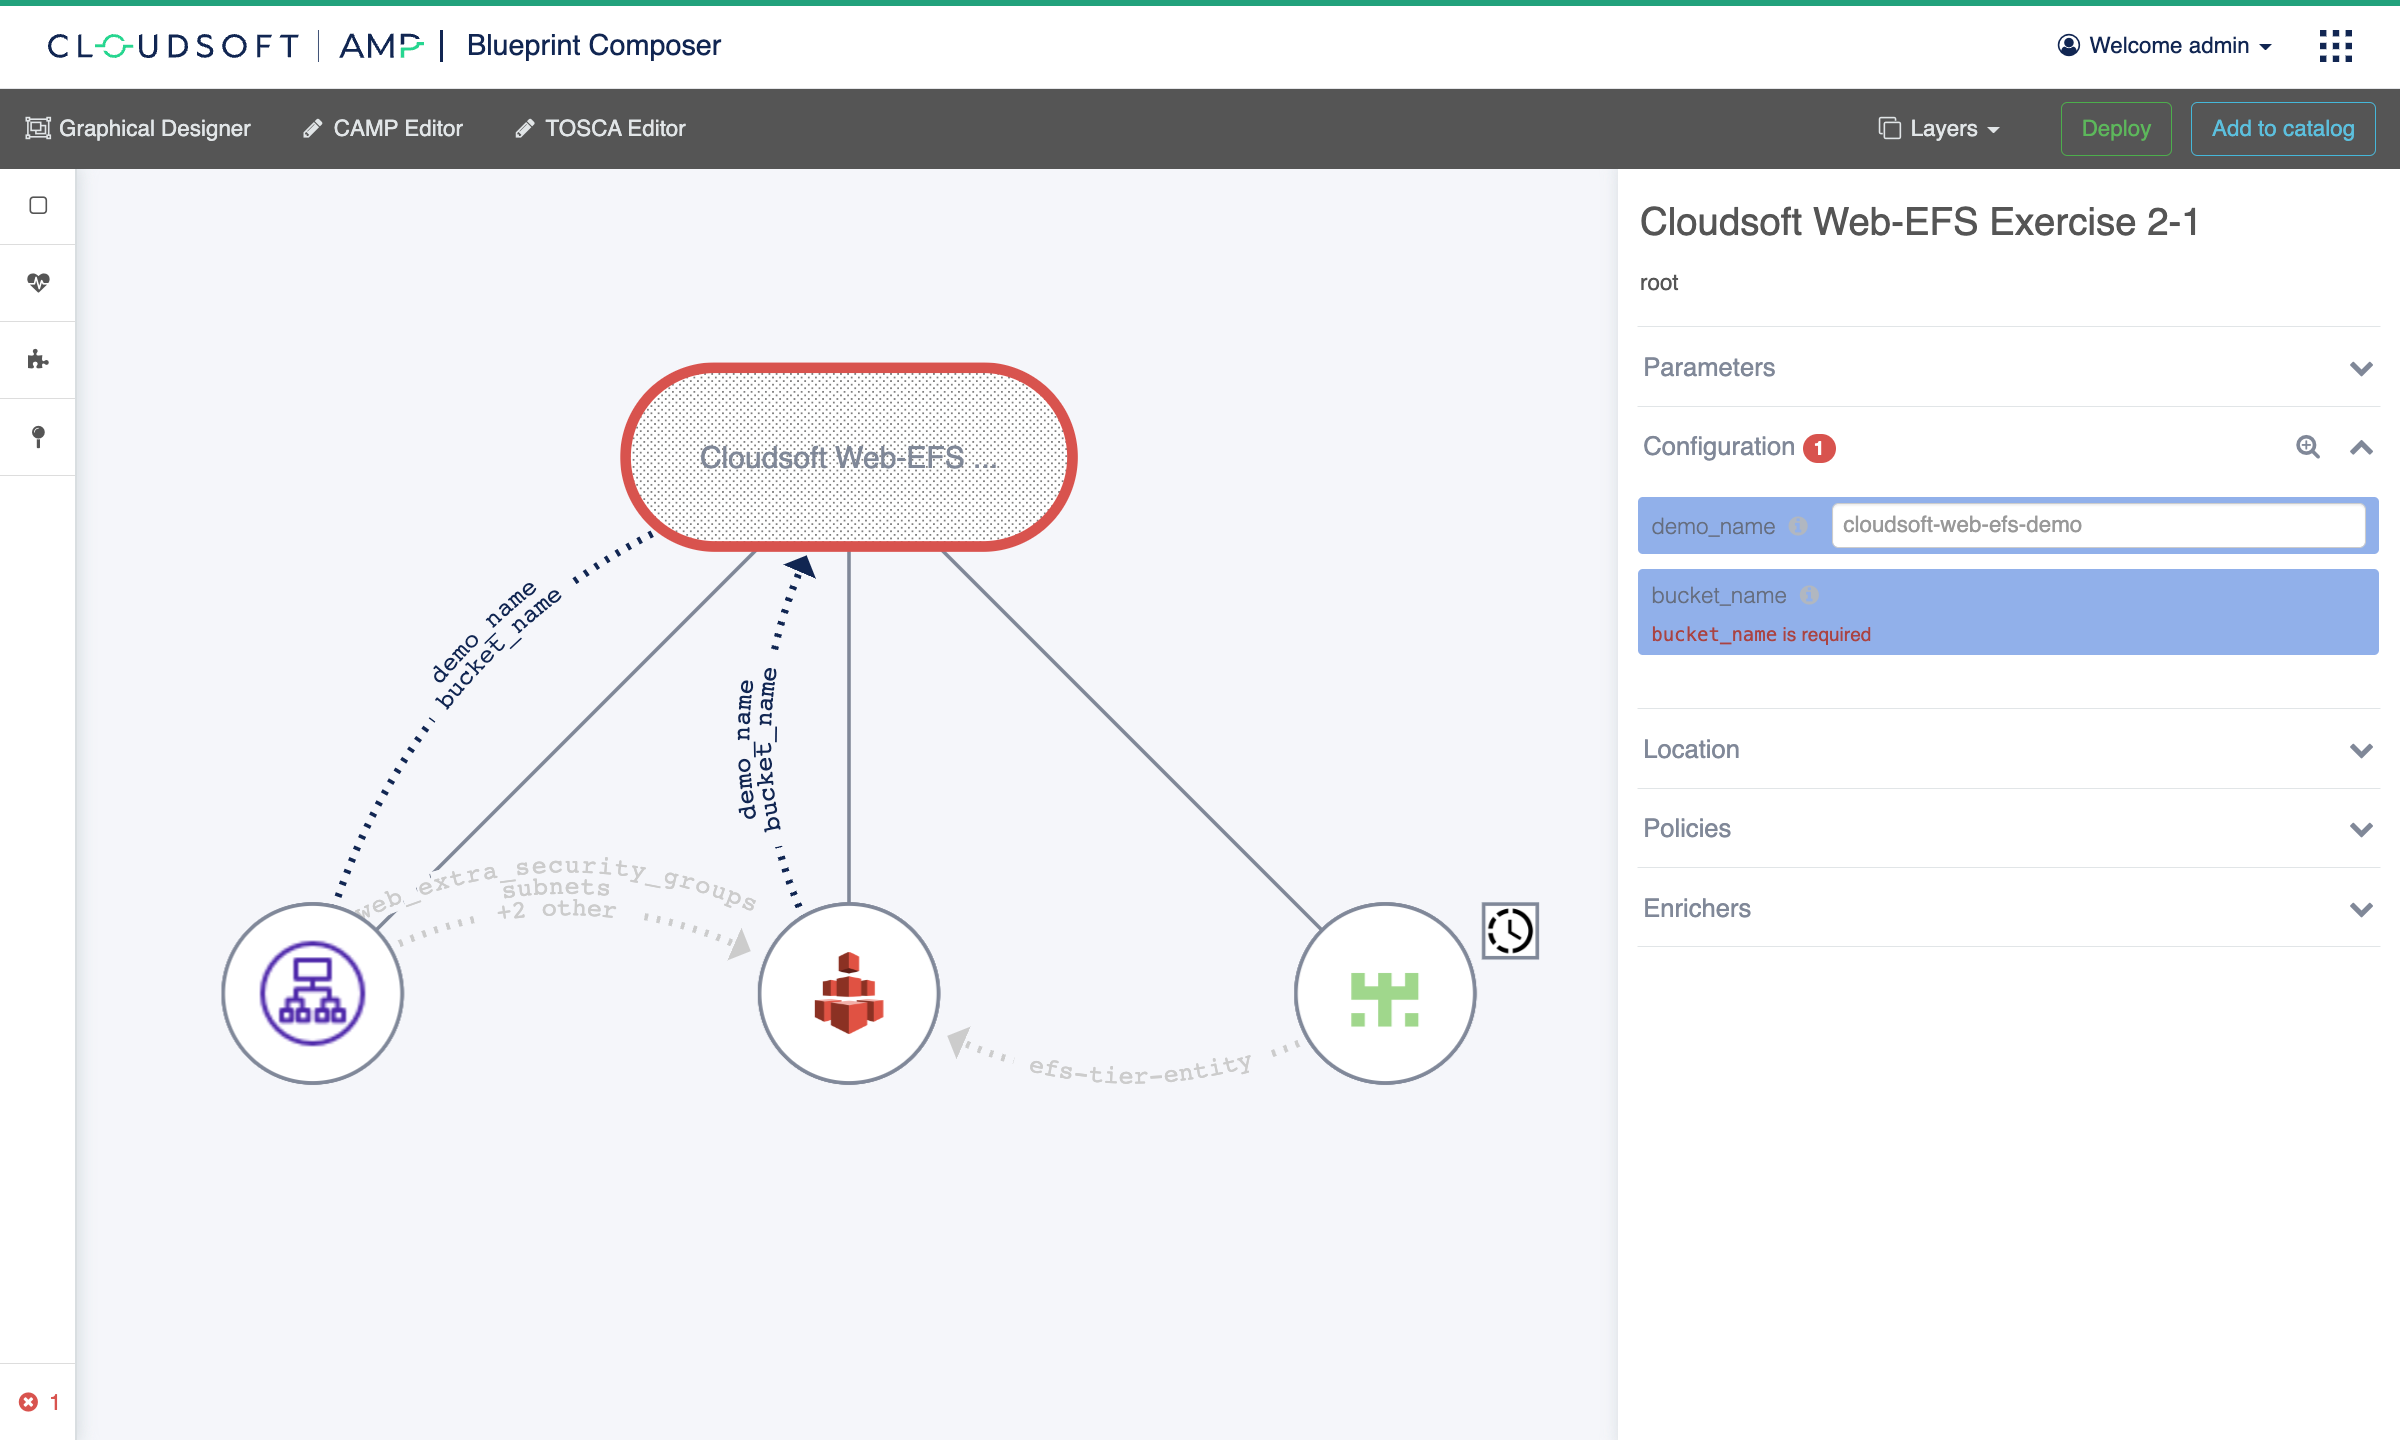
For bucket_name, enter the name of the bucket you created in the previous exercise (find it in the “Summary” ->
“Config” of the “S3 Bucket Terraform Template” entity). You may also consider changing demo_name to something
identifiable, such as the token chosen for YOUR_NAME_HERE. This name token is passed into Terraform templates of this
exercise to name resources that it creates, wherever possible.
When you’re ready, click “Deploy”.
Exploring the Deployment
Once deployed, you will be taken to the “Dashboard” view of the application. We will return here in a moment, but while the application is creating the “Inspector” is more interesting. Click the “Inspector” button in the top-right to view the application in the inspector.
View the Deployed Application: Inspector
The inspector shows a tree-view of all applications managed by AMP. The tree can be expanded to show the toplogy: a “Web Tier”, an “EFS Tier”, and an “EFS Content Manager”. The two tiers will automatically expand as the blueprint deploys to include the resources created using Terraform. For now click “Activities” to view progress, or simply wait until everything goes solid green. After about 10 minutes you should see the following:

Note the URL shown on the “Summary” tab, pointing to the load balancer provisioned. Click on that, and you’ll be taken to the “Hello World” website that is deployed via EFS. Keep that open in another tab, because we’ll refresh it from time to time as we make updates.
View the Deployed Application: Dashboard
In yet another tab, return to the “Dashboard”. This can always be found from the “nine-dots” modules button in the top-right of AMP. The dashboard will also list current applications, optionally grouped by environment or line-of-business or other pivotable characteristic, so health of a group of applications can easily be viewed. Here, we will look specifically at our “Web+EFS” application, so select it.
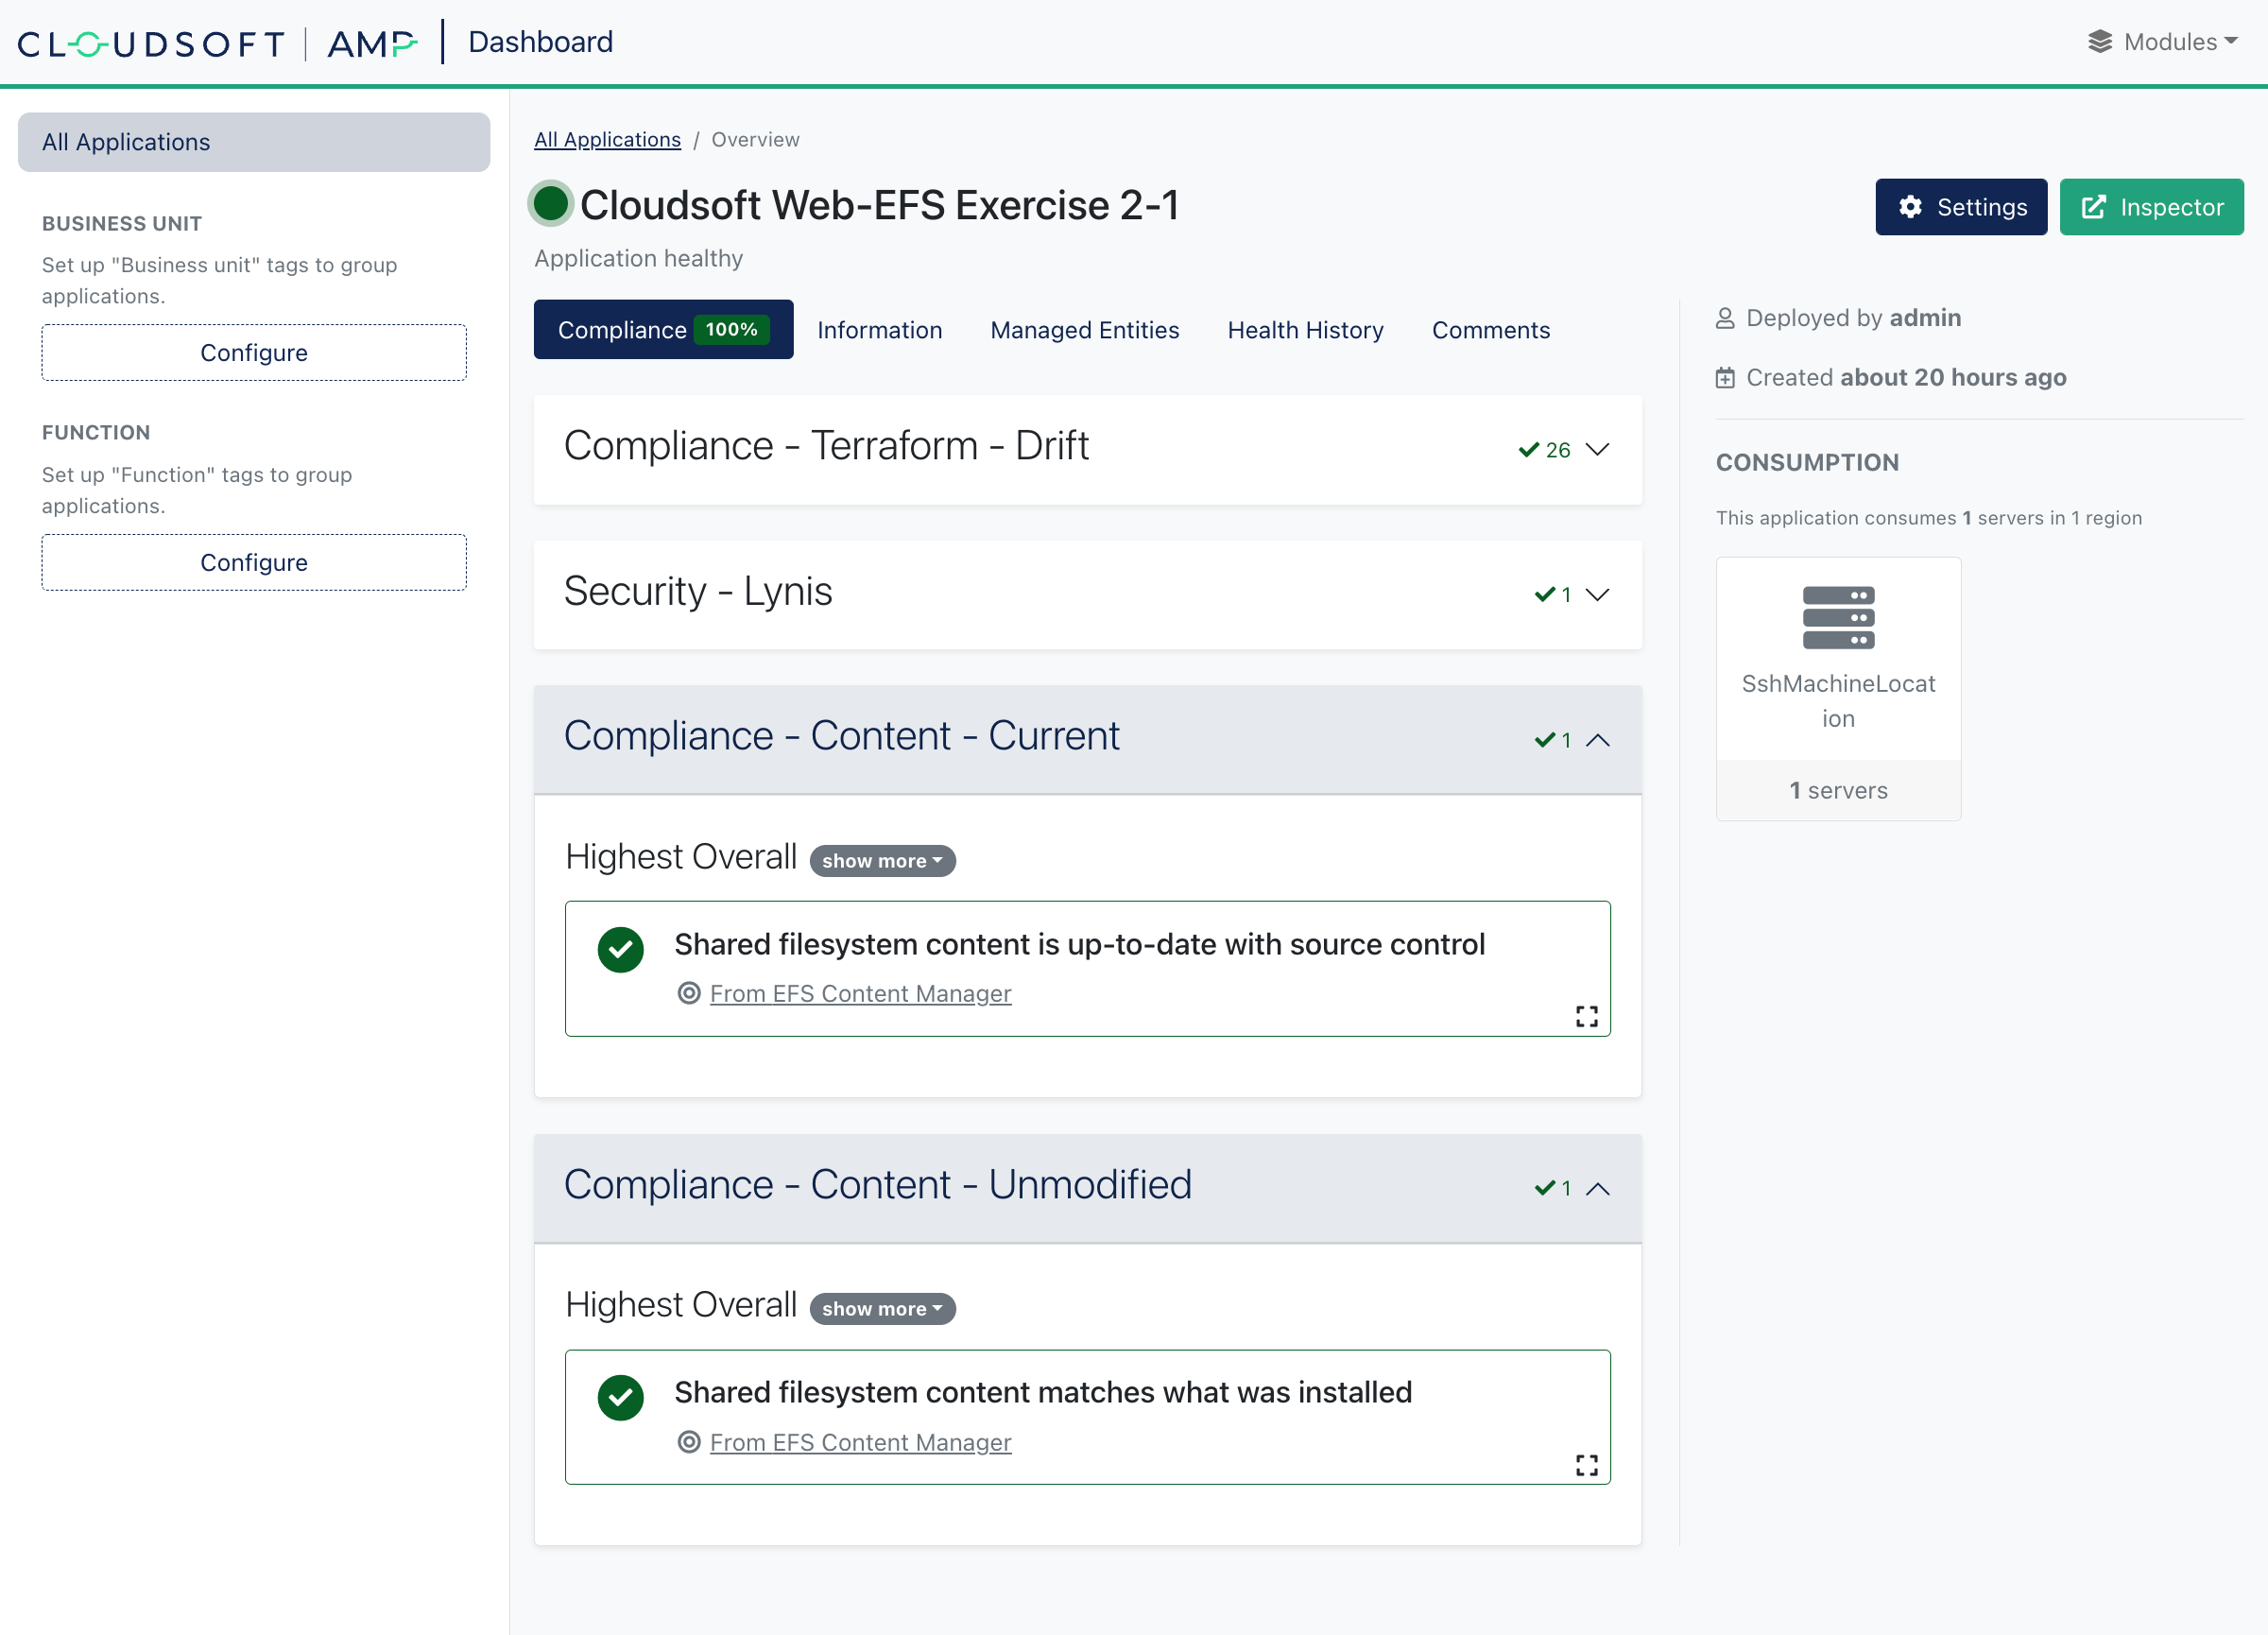
The blueprint used here includes four compliance checks, two common ones for Terraform Drift Detection and a Lynis Security Scan which will be explored in Exercise 3-3, and two that are specific to this exercise:
- “Content - Unmodified” ensuring the content on the EFS is not manually modified
- “Content - Current” ensuring the content of the EFS is up-to-date with the current contents in source control
You can click on any of the summary cards to view details. Note that some of these checks may take a couple minutes to refresh. We recommend keeping the “Dashboard” open and returning to the “Inspector” in a separate tab, as we will switch between these views for this exercise.
Edit the Deployed Application: The Wrong Way
Let’s now update the content on the EFS being served by the web servers. We will do this by modifying files on the EFS itself, via the bastion server:
- Click on the “EFS Tier” in the Inspector and open the “Effectors” tab
- Find and click
runCommandOnBastionServer: this effector provides a standardized way to run a command on the bastion server - Enter
echo Hello manually modified world > /mnt/shared-file-system/active/index.htmlfor the “script” parameter and click “Confirm”
 More elaborate on-box edits
⌃
Return to the “Hello World” website you saw earlier and refresh that page; within a few seconds you should observe your message. Congratulations, you’ve updated the web site!
Next return to the “Dashboard” tab. Within a few minutes you should see one of the checks fail. Congratulations, you’ve also triggered a violation by updating the web site in an unsustainable way!
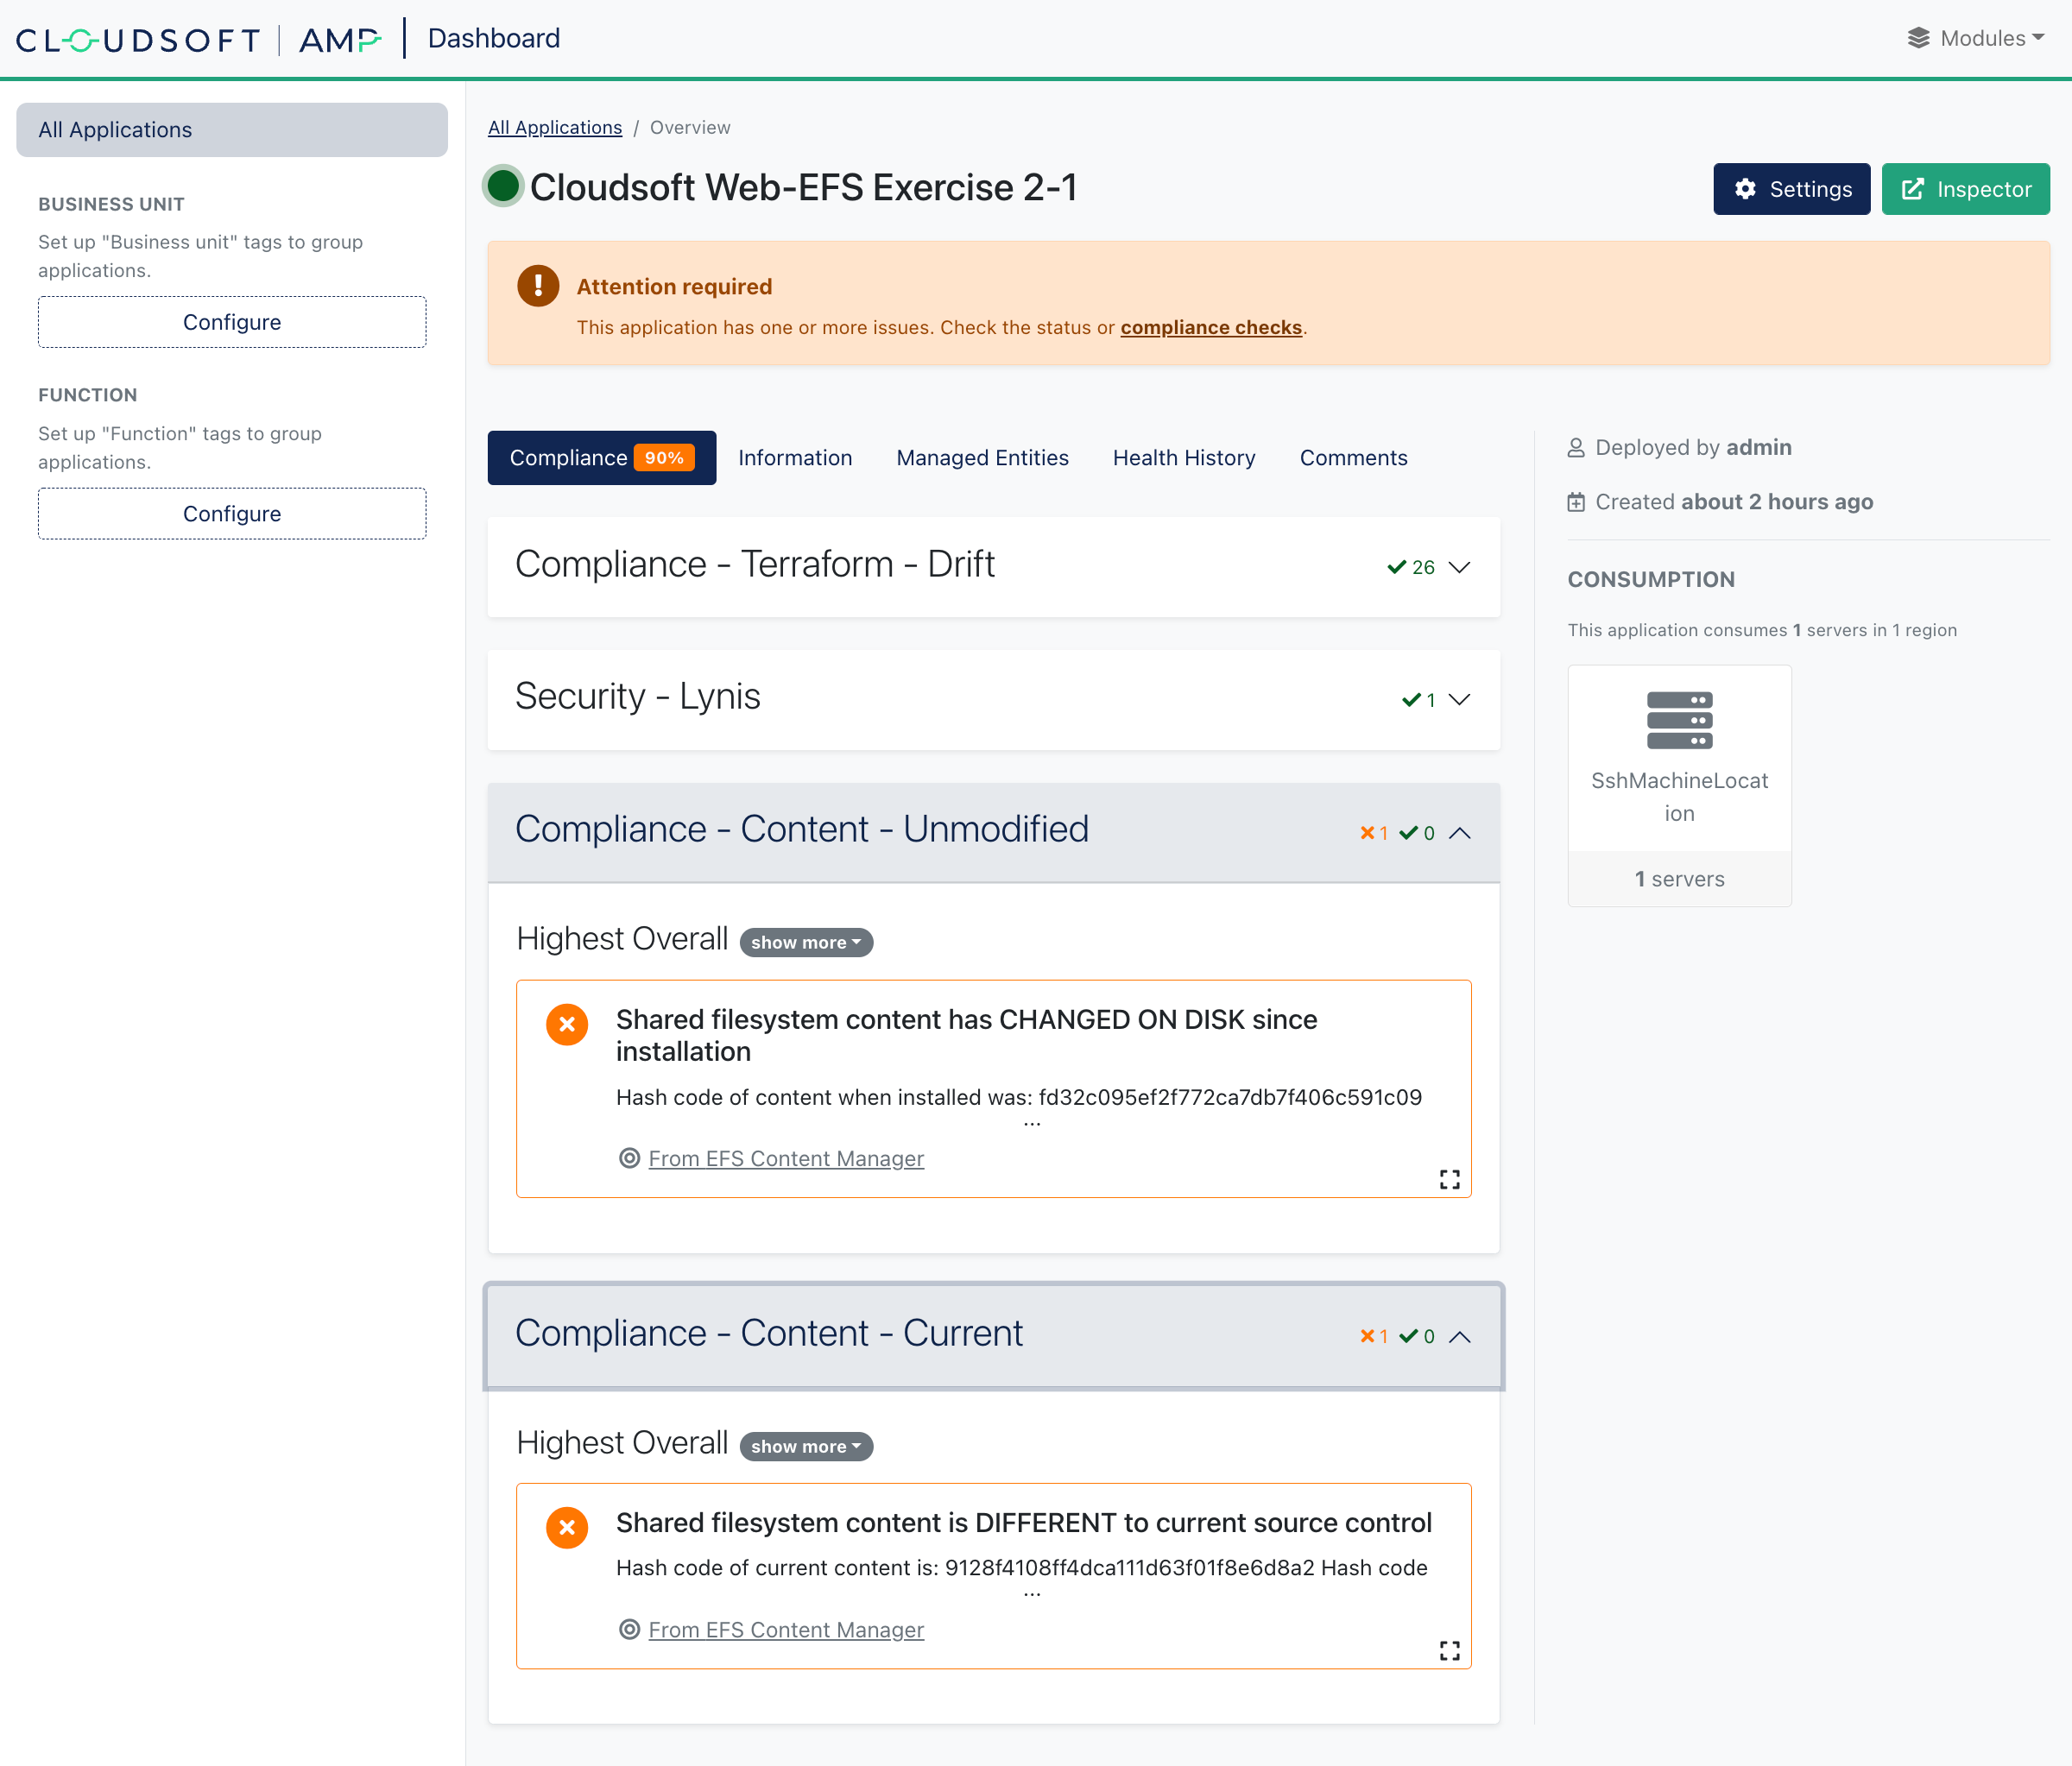
In an infrastructure-as-code world, a direct change to a system under management is bad practice, both because it can be a security risk and because the change is likely to be undone when a system is restored.
In fact, let’s restore the content right now to correct the violation. Cloudsoft AMP can be configured to do this automatically, but in this case we’ll show the manual steps. Locate the “EFS Content Manager” entity in the Inspector: this is where the logic for updating and checking the content is stored in the AMP blueprint. Under “Effectors”, click and run “updateFiles”. Within a few seconds the previous content should be restored, and soon after that the violation should disappear in the dashboard.
Edit the Deployed Application: The Right Way
This blueprint is configured to pull from a GitHub project, optionally referencing a specific commit or taking the latest code. The right way to update the application being served is to update the project it references.
Out-of-the-box, the project uses a Cloudsoft-supplied GitHub project. To edit this, we will make a project you own, tell our blueprint to use it, then update the project and tell our blueprint to update.
- Fork the cloudsoft/hello-world-static-html project on GitHub (creating a GitHub account if you don’t have one)
- In the AMP “Inspector”, open the “EFS Content Manager” entity Summary -> Config. Find the
source-repo-urlentry, and set the value to be the URL of your project, of the formhttps://github.com/<YOUR_GIT_ID>/hello-world-html.git. - Next, in the “Effectors” tab on the same entity, run
updateFilesagain. (This won’t do anything noticeable yet because your project is identical.) - Finally, edit the
index.htmlfile, changing the words “Hello World” to “Hello Good New World” (if unfamiliar with thegitworkflow you can do this in the browser within your forked project at GitHub, making sure to commit this to the main branch)
Within a couple minutes, AMP will show violations again, this time due to another policy on the “EFS Content Manager”:
the files in EFS should be current with the files under source control, and by default we track the main branch.
Again, manually correct this by running the updateFiles effector. You should then see “Hello Good New World” in the application,
and this time after a short while the website will be updated and all the violations will be cleared.
 Working with branches
⌃
 Timings
⌃
Update the Deployed Application: Automation
We mentioned earlier that part of AMP’s duty is to provide consistent orchestration and visibility.
Being able to identify anomalies, according to your logic or best practices, is part of this.
Being able to respond to these, using your preferred toolchains, is another part.
It is simple to add a policy in AMP that responds to these violations by invoking the updateFiles effector automatically,
or by reapplying the terraform; but it is also simple and common to have preferred toolchains call to AMP to standardize their workflow.
And of course it’s better if we can avoid triggering a violation!
We’ll do this by adding a GitHub Action (aka a git hook) so that our updateFiles effector here is automatically invoked whenever the main branch changes.
At GitHub, open the “Actions” tab of your forked repo, and create a “Simple workflow” (or “set up a workflow yourself”).
Choose a file name and supply the following for the contents:
name: Invoke updateFiles on deployment managed by Cloudsoft AMP

on:
  push:
    branches: [ "main" ]

  workflow_dispatch:

jobs:
  build:
    runs-on: ubuntu-latest
    steps:
      - name: Invoke updateFiles effector using curl
        env:
          AMP_PASSWORD: $\{\{ secrets.AMP_PASSWORD \}\}
        run: |
          curl -k -u <AMP_USERNAME>:$\{\{ secrets.AMP_PASSWORD \}\} -X POST -H 'Accept: application/json' -H 'Content-Type: application/json' https://<AMP_SERVER>/v1/applications/<APP_ID>/entities/<ENTITY_ID>/effectors/updateFiles
Next, we need to provide the correct values for the <...> arguments in the last line.
Cloudsoft AMP can help us here. Go to the “Effectors” tab on the “EFS Content Manager” entity, and click the “CLI” icon.
This will show the syntax to invoke the effector using either curl command or the br dedicated CLI.
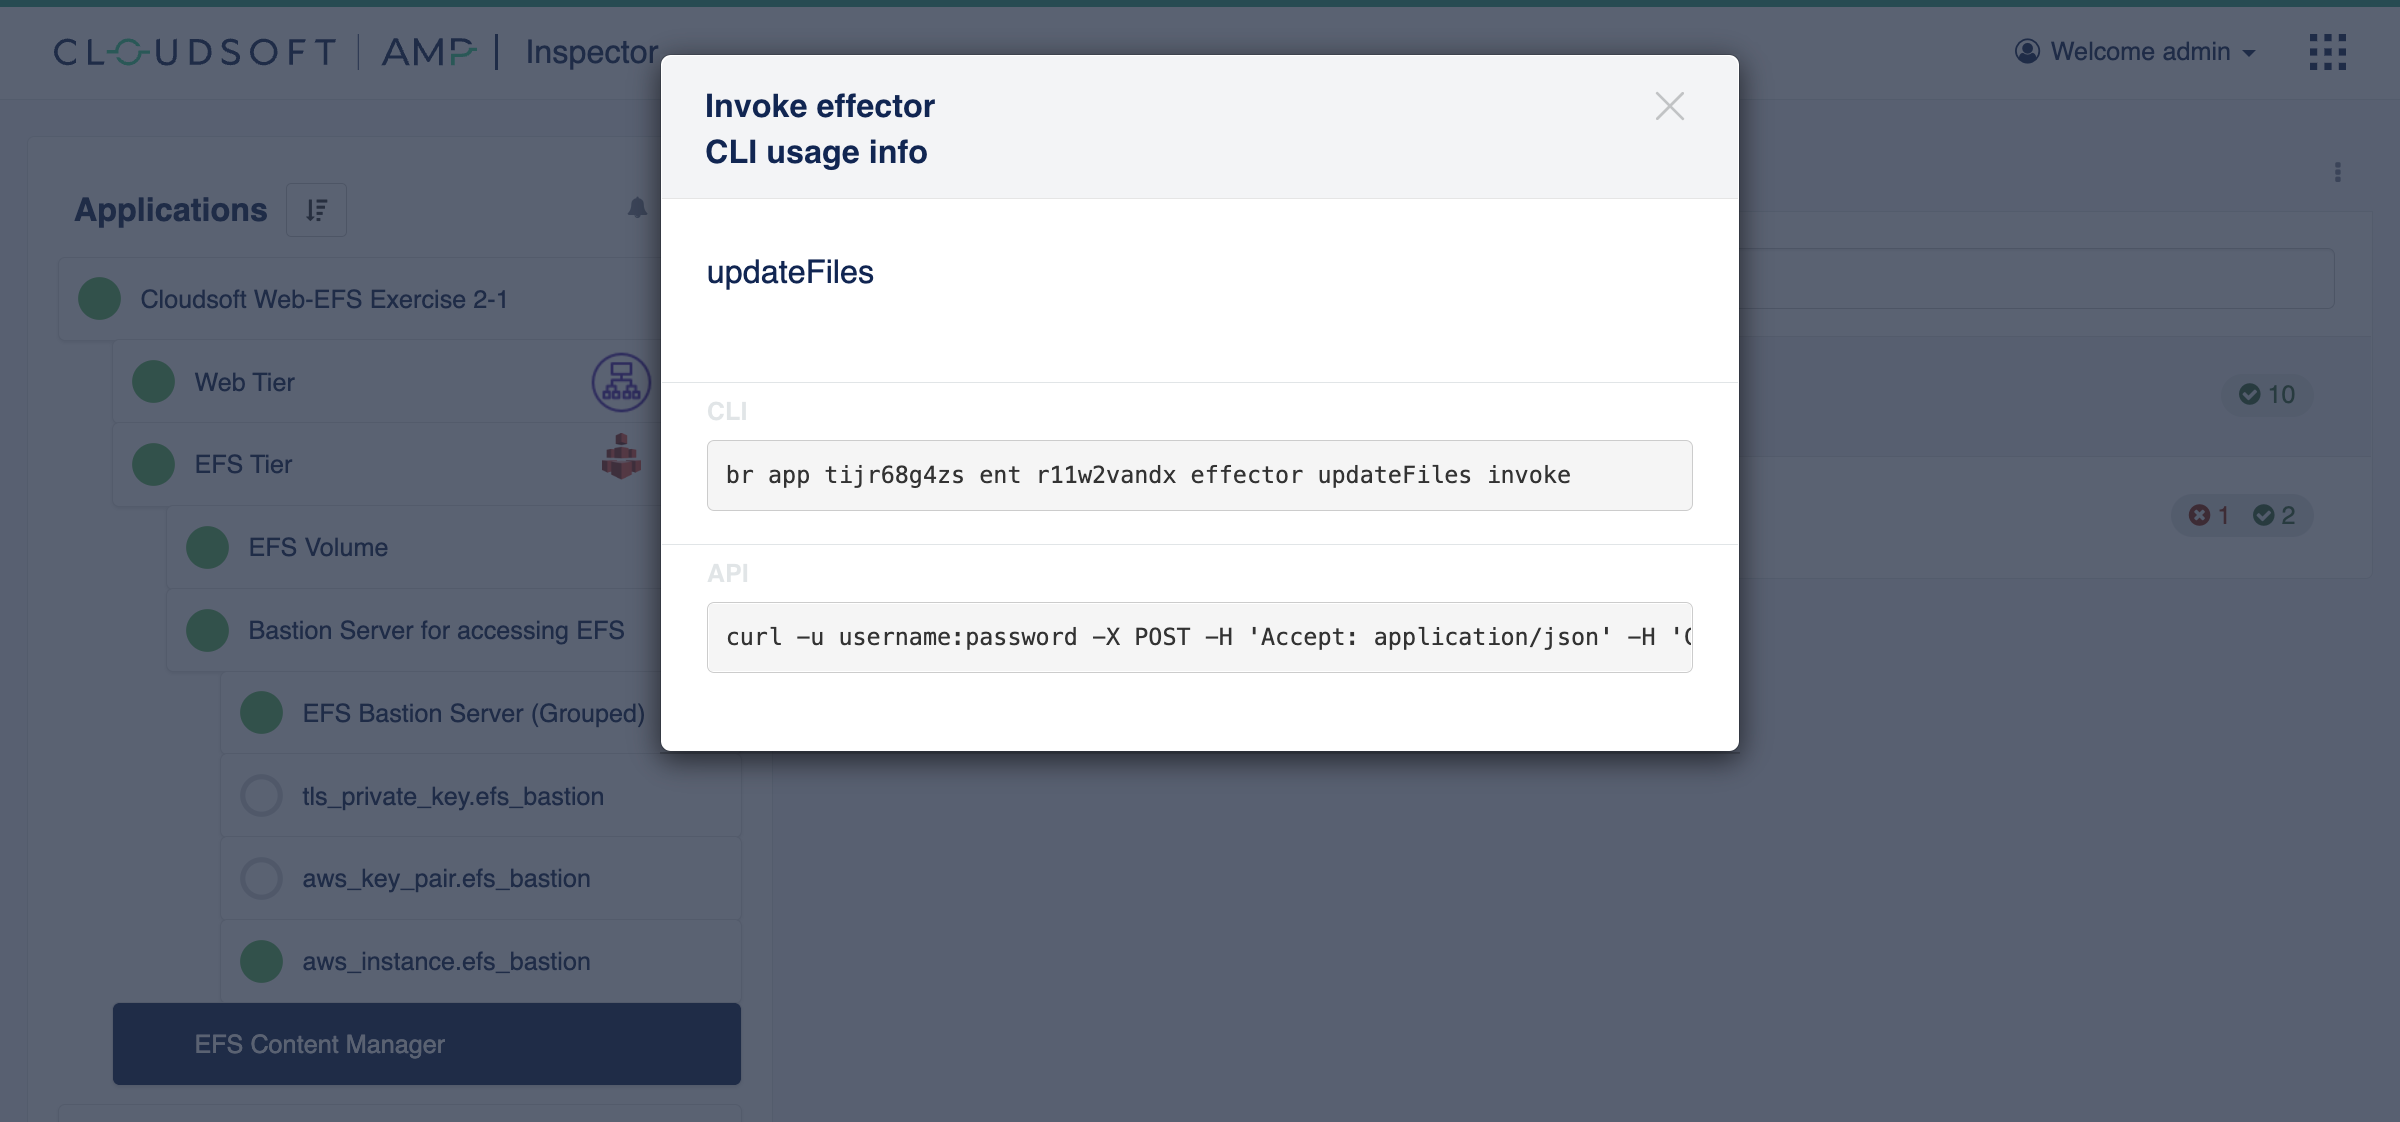
Copy that string for the URL path (replacing <APP_ID> and <ENTITY_ID>), and set the <AMP_USERNAME> for AMP and the <AMP_SERVER> correctly (including a port if not on 443).
Do not put your password here, because it will be publicly visible!
Instead, encode this securely at GitHub
under “Settings” for the repo, select “Secrets” and create a new “Repository Secret” called AMP_PASSWORD containing the AMP password.
The above code will then retrieve the secret.
Click “Start Commit” on the action and commit this to the main branch.
The workflow should then trigger itself, and in “Actions” at GitHub you should see the execution.
If it’s successful, you should also see the invocation and activity at AMP.
 AMP not publicly accessible
⌃
Now make another change to the content in the project, perhaps to say “Hello Smoothly Automated New World”.
This time, within a few seconds, our website will show the new content and AMP shouldn’t show any violations.
We can inspect the Action in GitHub and the updateFiles call in AMP’s “Activities” view to see exactly what happened;
AMP and the GitHub actions are together giving us a good separation of concerns, consistent execution, and auditability.
AMP can just as easily be integrated into build pipelines, ITSM workflows, or custom CLI scripts,
using the AMP CLI and/or REST API.
It’s also not uncommon for the AMP blueprint to tell other tools to call back to AMP at runtime;
for example you could make the AMP blueprint, as part of deployment, automatically create and commit the Git hook which
invokes the updateFiles effector.
Unpacking the blueprints
Cloudsoft’s philosophy is that the only way to manage the complexity of modern IT is to make it as easy as possible for people to see what is going on, using hierarchical models so that the most-useful high-level information is most easily available, and operators can drill down to find out more wherever they need. All the activities AMP drives are recorded and inspectable, whether Terraform or Ansible or bash or REST or custom containers; if you’ve not explored the “Activities” tab, do so now. And when it is necessary to look in external sources, such as a cloud console, you’ll normally find all the relevant details for a resource in the AMP sensors, so you can easily navigate to them.
As design time, the best practices are stored in blueprints which can be extended and reused.
We started this exercise by installing two pre-built bundles, efs-tier and web-tier-serving-efs.
These consist of Cloudsoft AMP blueprints using Terraform infrastructure-as-code templates
and adding additional management logic. Specifically:
-
“EFS Tier” consists of a Terraform template for EFS and associated networking control resources, a Terraform template for the Bastion Server, and several sensors, effectors and policies. This is built up from scratch in the Exercise 3 series. The one change we’ve added atop that is to package it so we can install it to the AMP Catalog and use it in our blueprint. This is done through the
catalog.bomfile and with the addition of arunCommandOnBastionServereffector for running arbitrary scripts (so that the blueprint we build here can run commands on the bastion server defined inside the “EFS Tier” blueprint) and a change to thecron-schedulerpolicy so for this exercise we do not stop the bastion server in the evenings. The code is available here, including the Terraform for efs-volume-tf and efs-server-tf. -
“Web Tier serving EFS” consists of a Terraform template for an ELB and an ASG, including as part of the ASG launch configuration the installation of httpd and mounting a nominated EFS drive The code is available here including the Terraform.
What is probably more interesting is the “Web and EFS App” blueprint we deployed, referencing the two blueprints above along with a third entity:
- “EFS Content Manager” defines our management logic for updating and verifying the content being served.
This entity does not correspond to an external resource, but gives us a logical component in our model
which leverages the sensors and effectors from “EFS Tier”, e.g.
runCommandOnBastionServer, to implement the behaviour needed for this deployment. It defines two effectors,updateFilesandcomputeContentCurrentHashwhich callrunCommandOnBastionServersupplying our custom scripts along with a few policies and sensors.- The
workflow-effectorupdateFilesupdates the files at the EFS drive with the desired commit-ish from source control and then usesmd5sumto compute and set thecontent-last-installed-hashsensor. Aworkflow-policyis then set up to subscribe to the sensorservice.isUpfromefs-bastion-server-groupedand invoke this effector whenever AMP detects the EFS bastion server comes up. - The
workflow-effectorcomputeContentCurrentHashrunsmd5sumover the files being served at the EFS mount and sets acontent-current-hashsensor. Again a policy – this timecron-scheduler– runs this effector every five minutes. - A
workflow-sensoris defined to compute and set the sensordashboard.compliance.content-unmodifiedwhenevercontent-current-hashorcontent-last-installed-hashchanges, called a “sensor feed”. If these two sensor values match, our script outputs YAML for a passingcompliance-checksaying the “content matches what was installed”; if the two sensors don’t match, it outputs acompliance-checkwithpass: falseand the details. - Two more
workflow-sensorinstances are defined to track and compare thesource-current-hash, one checking out the latest source, computing its hash, and setting that sensor, and another comparing the sensor withcontent-last-installed-hashand setting acompliance-checkwhich says either{ pass: true, summary: "... content is up-to-date with source control" }or{ pass: false, summary: "... content is DIFFERENT to current source control" }
- The
You can inspect each of these parts of the “EFS Content Manager” in the blueprint source code,
in the Composer (click on the root of the application in Inspector, expand the Summary -> Blueprint section,
and click the icon there to re-open in Composer), or at runtime in the Inspector
(especially on the “EFS Content Manager”, see the Sensors tab for the hash sensors, and the Management tab policies and feeds).
What’s next?
You’ve now seen a sample three-tier application blueprint, using Terraform for the infrastructure then adding sensors, runtime operations, and runtime management logic, and you’ve seen how this can be integrated with a CI/CD pipeline to automate behavior. This is a good jumping off point for considering your automation and management needs, from blue-green updates to resilience and portability.
To remove this deployment, run the “stop” effector on the “Cloudsoft Web+EFS Exercise” blueprint. Keep the S3 bucket for use in the next exercises.
The next series of exercises show in detail how the “EFS Tier” is constructed, exploring each line of that AMP blueprint to build up the EFS volume and the EFS bastion server using AMP.