Write a new Blueprint with bash
Objectives
At the end of this lesson you will:
- Understand the YAML blueprint structure
- Have deployed a simple web server that has no dependencies on pre-built packages
- Understand there is no magic required to write blueprints for your applications
Instructions
Run the blueprint
- Access the Blueprint Composer in AMP
- Click
TOSCA Editor - Paste the blueprint (copy from below) - make sure to overwrite any code already in the editor
- Click
Deployand wait for it to succeed - Open the application’s web page
Note: This blueprint assumes you are using vagrant to run your AMP and therefore have already-provisioned compute nodes available to AMP as a named location called byon.
tosca_definitions_version: tosca_simple_yaml_1_3
metadata:
  template_name: tosca-python-webserver
topology_template:
  node_templates:
    host-node:
      type: tosca.nodes.Compute
      attributes:
        app_port: 8020
      capabilities:
        cloudsoft:
          properties:
            required.ports: { get_attribute: [ SELF, app_port ] }

    python-web-server:
      type: tosca.nodes.SoftwareComponent
      attributes:
        main.uri:
          concat: ['http://', {get_attribute: [HOST, public_address]}, ':', {get_attribute: [HOST, app_port]}]
      requirements:
        - host: host-node

      interfaces:
        Standard:
          create: classpath://io.cloudsoft.amp.amp-docs-support-bundle:tutorials/bash-blueprint/pw-create.sh
          configure:
            implementation: classpath://io.cloudsoft.amp.amp-docs-support-bundle:tutorials/bash-blueprint/pw-configure.sh
            inputs:
              HOSTNAME: {get_attribute: [HOST, public_address]}
          start:
            implementation: classpath://io.cloudsoft.amp.amp-docs-support-bundle:tutorials/bash-blueprint/pw-start.sh
            inputs:
              PORT: {get_attribute: [HOST, app_port]}
What does success look like?
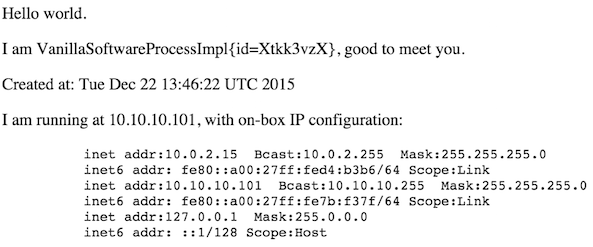
This is a very simple python single-page, web application:
hello world.
i am 11.22.33.44

created at: Thu Aug 5 14:54:46 UTC 2021

i am running at 11.22.33.44, with on-box ip configuration:

          inet 11.22.33.55  netmask 255.255.240.0  broadcast 33.22.11.255
        inet6 1111::aaaa:5555:ffff:123  prefixlen 64  scopeid 0x20
        inet 127.0.0.1  netmask 255.0.0.0
        inet6 ::1  prefixlen 128  scopeid 0x10
The Structure of a Blueprint
The blueprint containing 2 parts: a metadata section and a topology template.
The metdata section provides information about the blueprint such as name and version.
The toplogy template is a simple blueprint that can be deployed. It can describe the elements of an application either in-line or using prefabricated components stored in AMP’s catalog.
Node templates
The main element in the topology template is the node_templates. This is a list of the entity of the application. Each entity has a type and a set of attributes, capabilities, and requirements. It also contains an interfaces element that describes the entity’s behaviour.
In the example above we have two entities. The host-node describes the information AMP needs to provision a host VM.
The python-webserver is hosted by the host-node and details how to install and run the webserver. Multiple software components can be hosted on the same compute node.
Config lifecycle
A standard entity has a lifecycle including the following operations:
- create - scripts for installing the entity
- configure - scripts for configuring the entity
- start - scripts to start the entity
- stop - scripts to stop the entity
Typically, create and configure are run when the component is initialised while start and stop may be run many times through the entity’s lifetime.
See Common Types for a more detailed explanation for how to configure operations.
What are Sensors?
The entities’s attributes describe the sensors that will be publised by the component.
- Sensors are the mechanism for entities to expose information for other entities to see and use.
- Sensors from an entity can be subscribed to by other entities to track changes in the entity’s activity.
- Sensors can be updated, potentially frequently, by the entity or associated tasks.
Examining the Task Activity
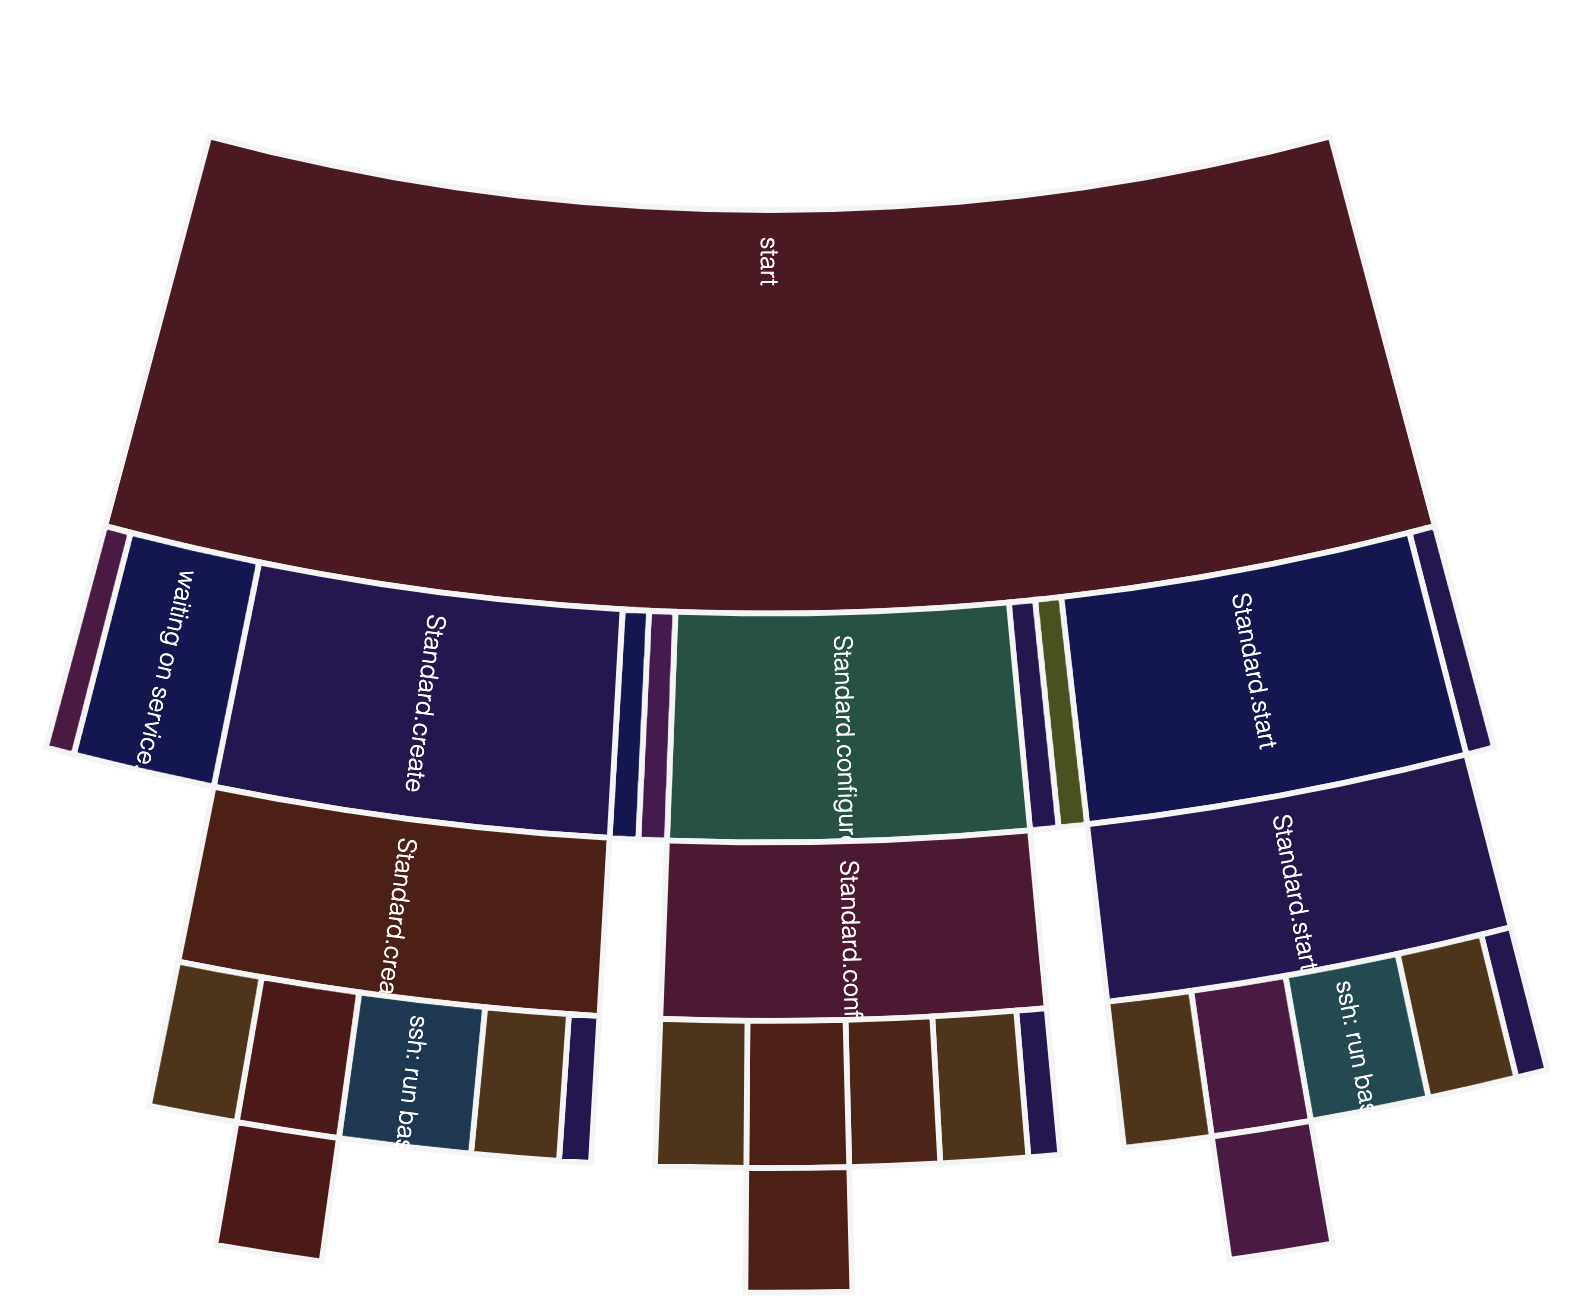
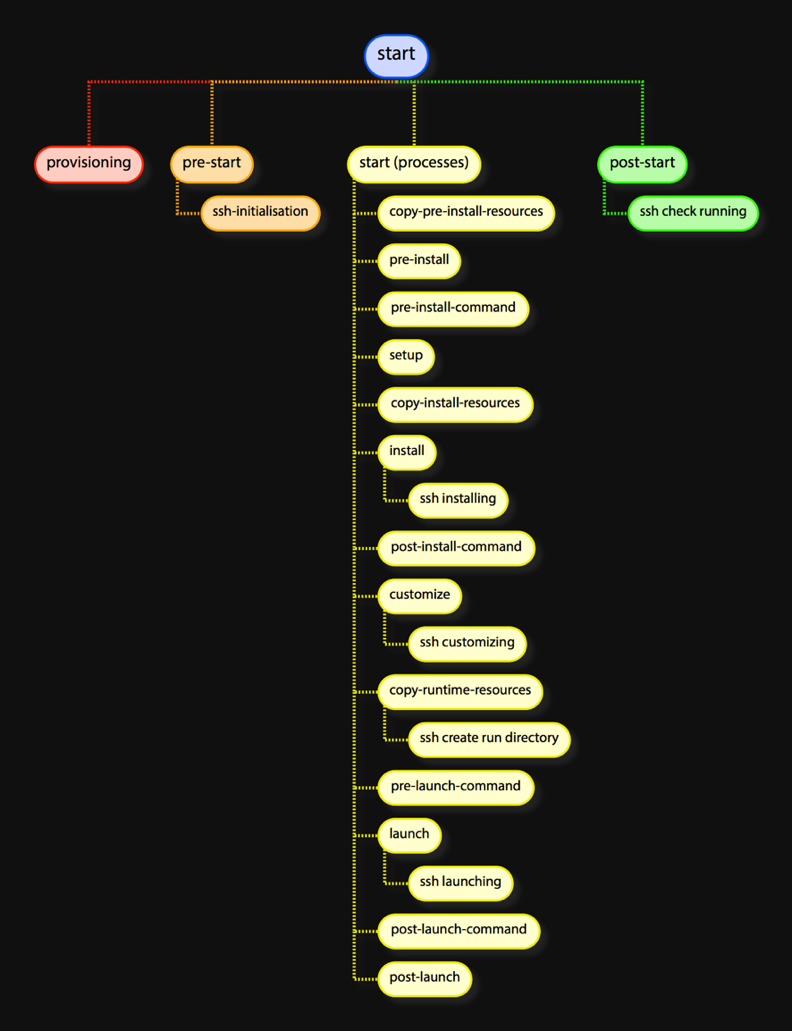
Operations, such as the steps in the lifecycle of entities defined in a blueprint, are tracked as “tasks” in AMP. Tasks operate in a hierarchical manner, for example, running an application may consist of steps to install software packages, configure them, then start the application.
The Progress Map (“kilt diagram”) nicely shows the relationship between the start activities:
Next
Pre-requisites
This tutorial assumes you have an already installed Cloudsoft AMP.
Instructions
Run the blueprint
- Access the Blueprint Composer in AMP
- Click
YAML Editor - Paste the blueprint (copy from below) - make sure to overwrite any code already in the editor
- Click
Deployand wait for it to succeed - Open the application’s web page
Note: This blueprint assumes you are using vagrant to run your AMP and therefore have already-provisioned compute nodes available to AMP as a named location called byon.
name: Python Web Server
# this example deploys a very simple python web server
services:
- type: vanilla-bash-server
name: My Bash Web Server VM
brooklyn.config:
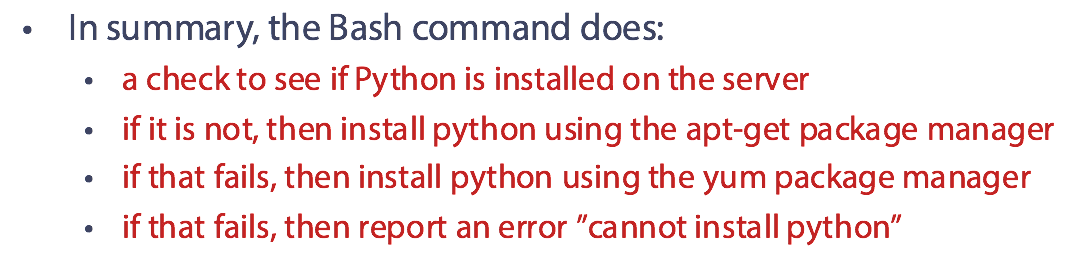
install.command: |
# install python if not present
which python || \
{ apt-get update && apt-get install python ; } || \
{ yum update && yum install python ; } || \
{ echo WARNING: cannot install python && exit 1 ; }
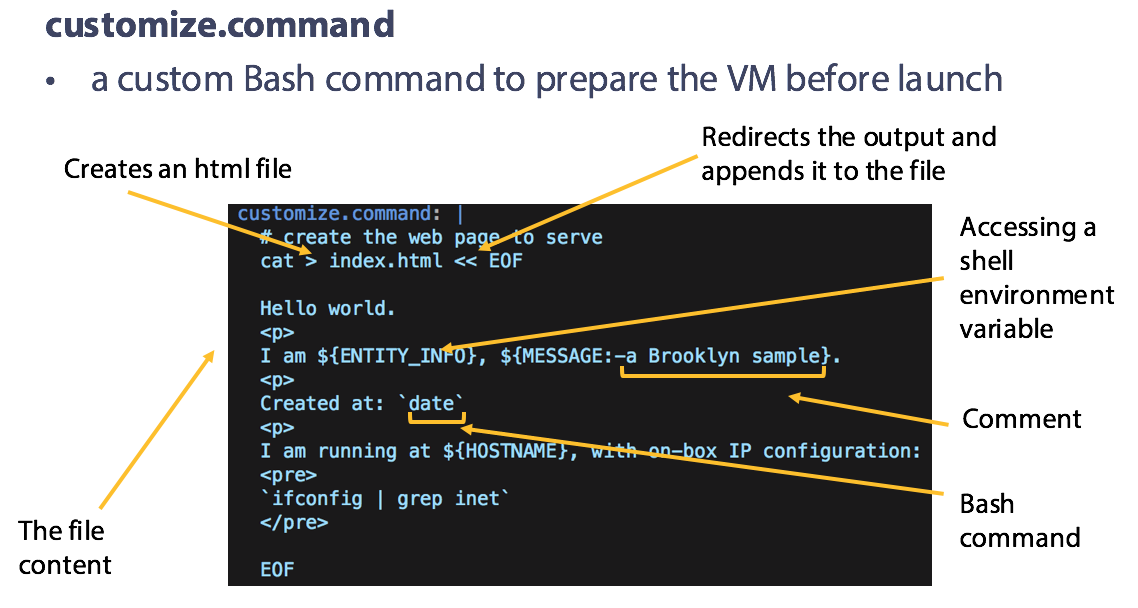
customize.command: |
# create the web page to serve
cat > index.html << EOF
Hello world.
<p>
I am ${ENTITY_INFO}, ${MESSAGE:-an AMP sample}.
<p>
Created at: `date`
<p>
I am running at ${HOSTNAME}, with on-box IP configuration:
<pre>
`ifconfig | grep inet`
</pre>
EOF
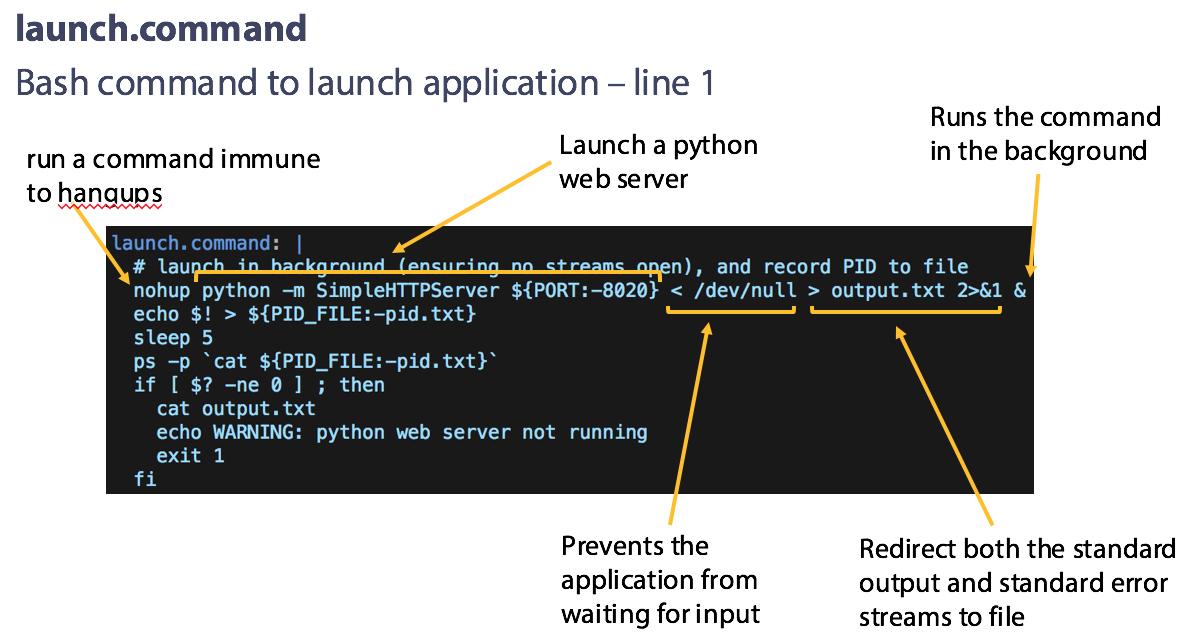
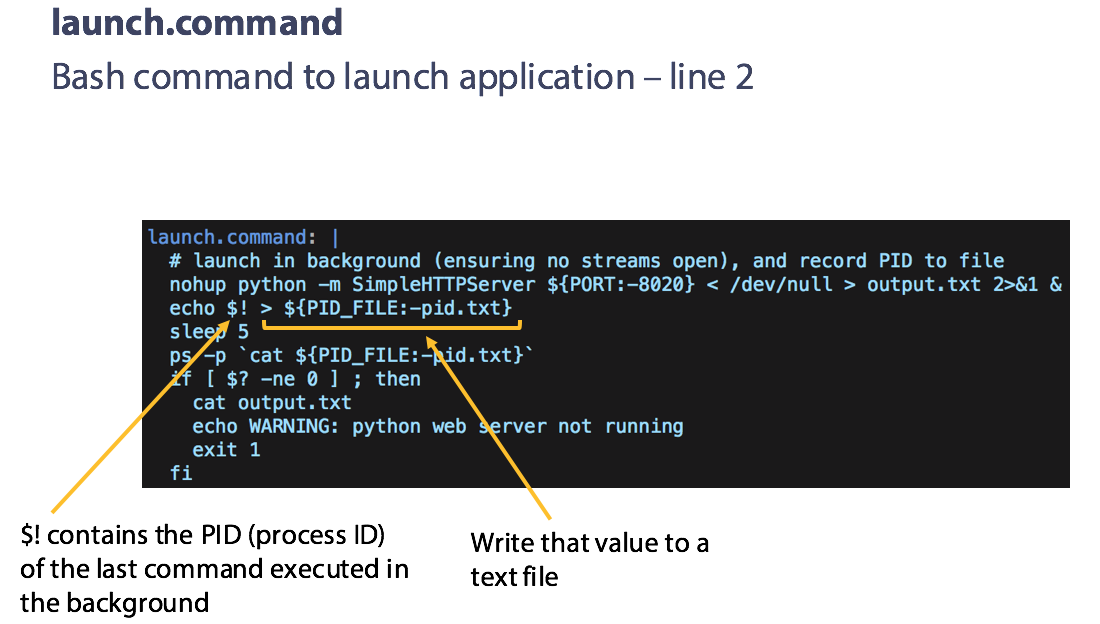
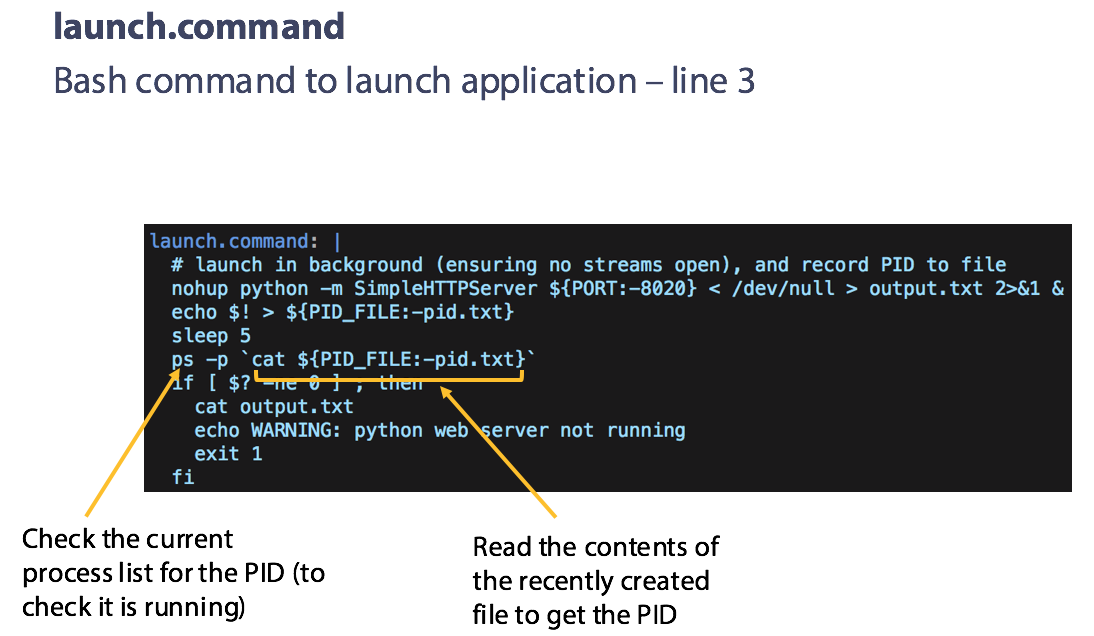
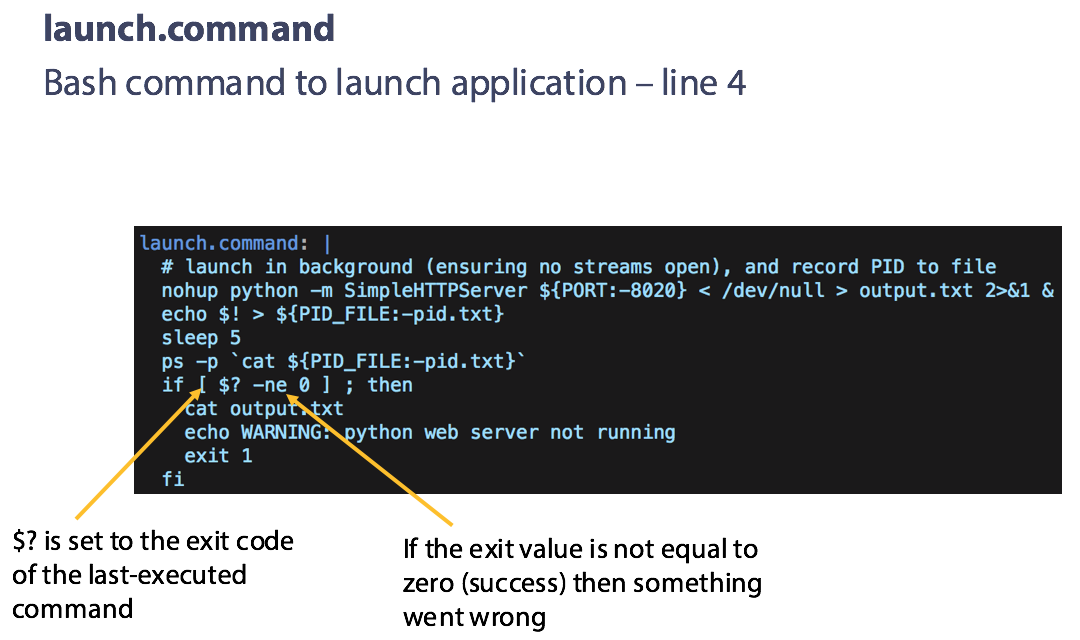
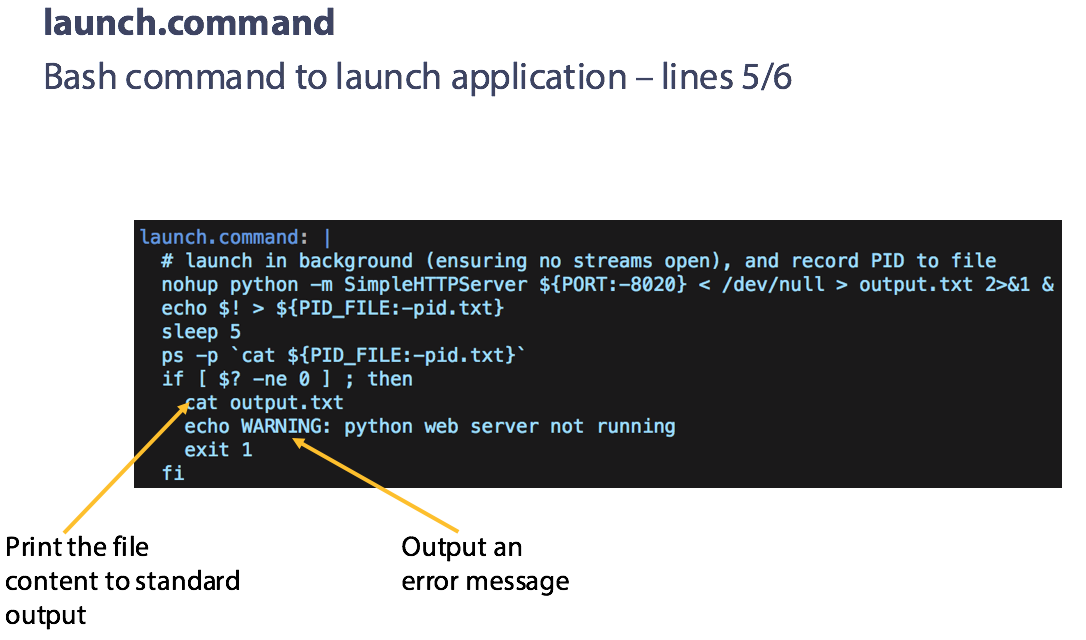
launch.command: |
# launch in background (ensuring no streams open), and record PID to file
nohup python -m SimpleHTTPServer ${PORT:-8020} < /dev/null > output.txt 2>&1 &
echo $! > ${PID_FILE:-pid.txt}
sleep 5
ps -p `cat ${PID_FILE:-pid.txt}`
if [ $? -ne 0 ] ; then
cat output.txt
echo WARNING: python web server not running
exit 1
fi
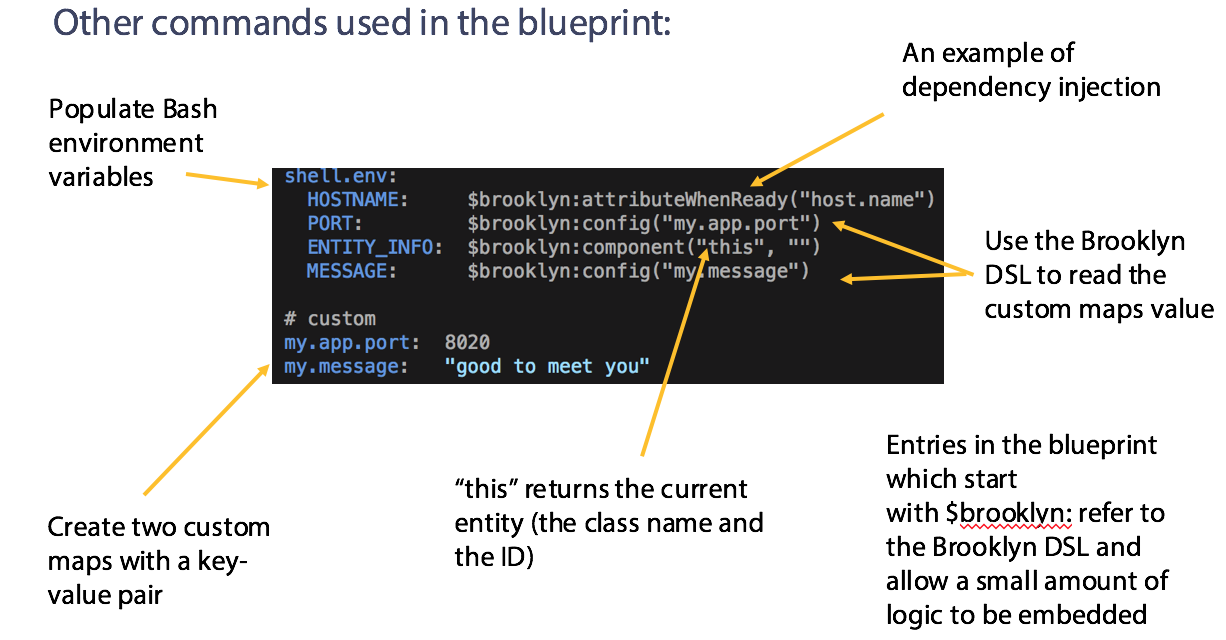
shell.env:
HOSTNAME: $brooklyn:attributeWhenReady("host.name")
PORT: $brooklyn:config("my.app.port")
ENTITY_INFO: $brooklyn:component("this", "")
MESSAGE: $brooklyn:config("my.message")
# custom
my.app.port: 8020
my.message: "good to meet you"
brooklyn.enrichers:
# publish the URL as a sensor; the GUI will pick this up (main.uri)
- type: org.apache.brooklyn.enricher.stock.Transformer
brooklyn.config:
uniqueTag: url-generator
enricher.sourceSensor: host.name
# use the definition from Attributes class, as it has a RendererHint so GUI makes it a link
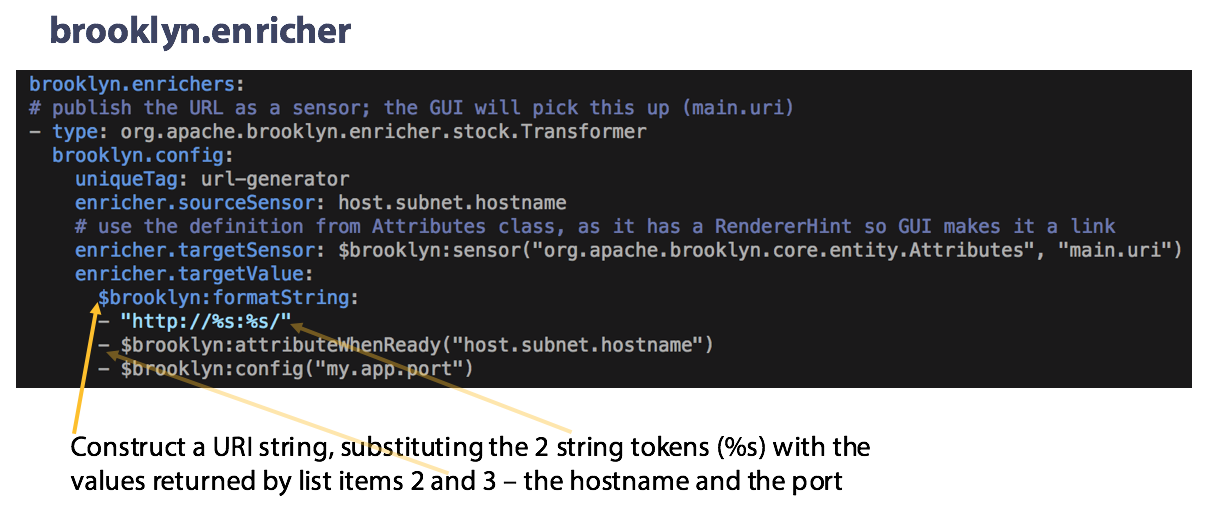
enricher.targetSensor: $brooklyn:sensor("org.apache.brooklyn.core.entity.Attributes", "main.uri")
enricher.targetValue:
$brooklyn:formatString:
- "http://%s:%s/"
- $brooklyn:attributeWhenReady("host.name")
- $brooklyn:config("my.app.port")
location: byonWhat does success look like?
This is a very simple python single-page, web application:
The Structure of a Blueprint
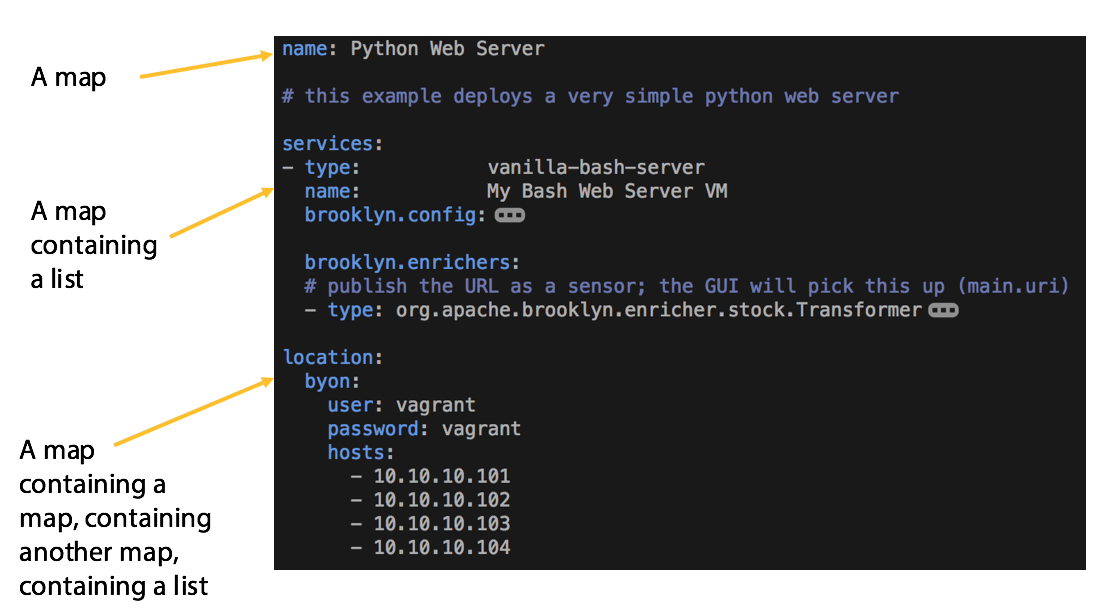
A Blueprint has three root elements:

The rest of the blueprint hangs off these 3 elements:

Service Definition
- The service block contains a list of maps
- Each map defines a service
- Each service has a type. The type can refer to:
- A Java class
- The ID of an item in the AMP catalog
What is the catalog? AMP provides a catalog, which is a collection of versioned blueprints and other resources, see here for further information.
Config lifecycle
Let us explore the Config section of the blueprint as this is where the software is installed, customized and launched on the target (in this case, the already-provisioned VM).

The first commands run on the VM are those in the Install section:

The next commands run on the VM are those in the Customize section:

Once the software has been installed and customized, it is now time to Launch the application:

Let us continue to explore the blueprint by looking at the sensors and enrichers used in it.
What are Sensors?
- Sensors are the mechanism for entities to expose information for other entities to see and use.
- Sensors from an entity can be subscribed to by other entities to track changes in the entity’s activity.
- Sensors can be updated, potentially frequently, by the entity or associated tasks.
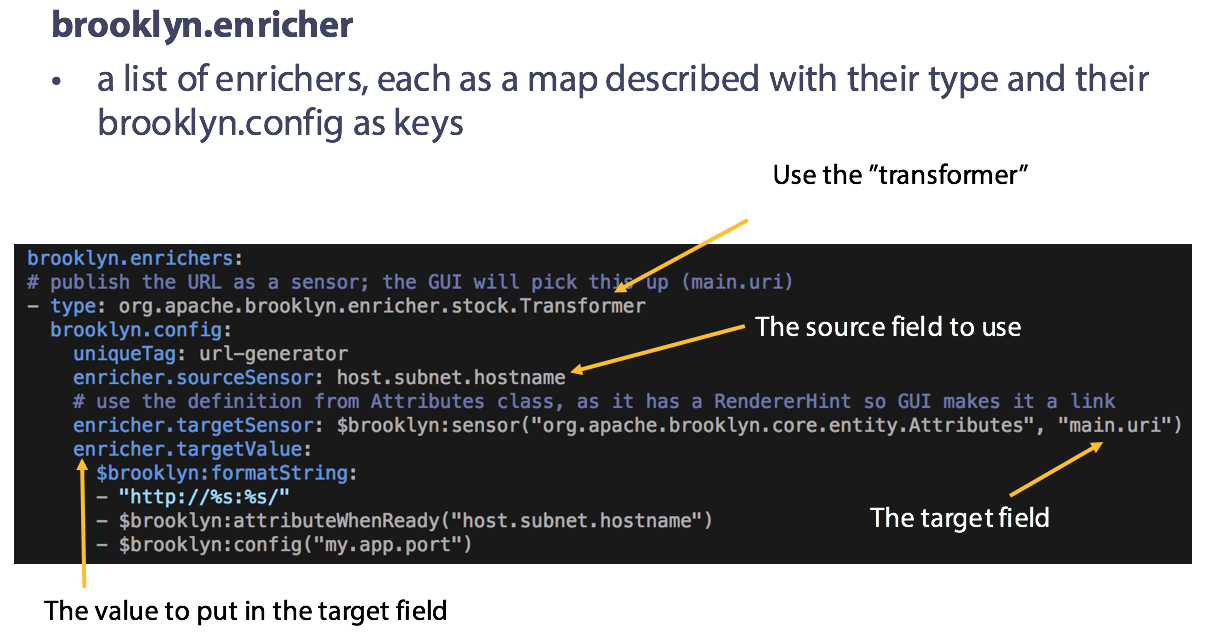
What are Enrichers?
- Enrichers are a tool which can subscribe to a sensor, or multiple sensors, manipulate the values and output to a new sensor.
- For example, an enricher which sums a sensor across multiple entities (used to get the total requests-per-second for all the web servers in a cluster), or an enricher which calculates a 60-second rolling average
Examining the Task Activity
Operations, such as the steps in the lifecycle of entities defined in a blueprint, are tracked as “tasks” in AMP. Tasks operate in a hierarchical manner, for example, running an application may consist of steps to install software packages, configure them, then start the application.
The task hierarchy for this Python web server blueprint is shown below:
Edit the blueprint
The next step is to stop the current application and modify the blueprint before running it again.
Edit your blueprint to:
- Run the application on port 8023
- Show the
run.dirsensor value on the webpage (details are below) - Run the blueprint
- View the web page
- Find the environment variable through the AMP UI
Steps:
- Find the sensor that displays the path of the directory in which the software is running
- Add the sensor value to the blueprint environment variables:
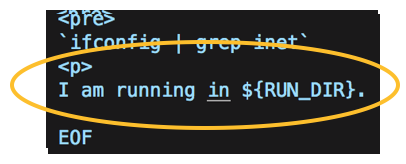
- Add the environment to the web page in the
customize.command:

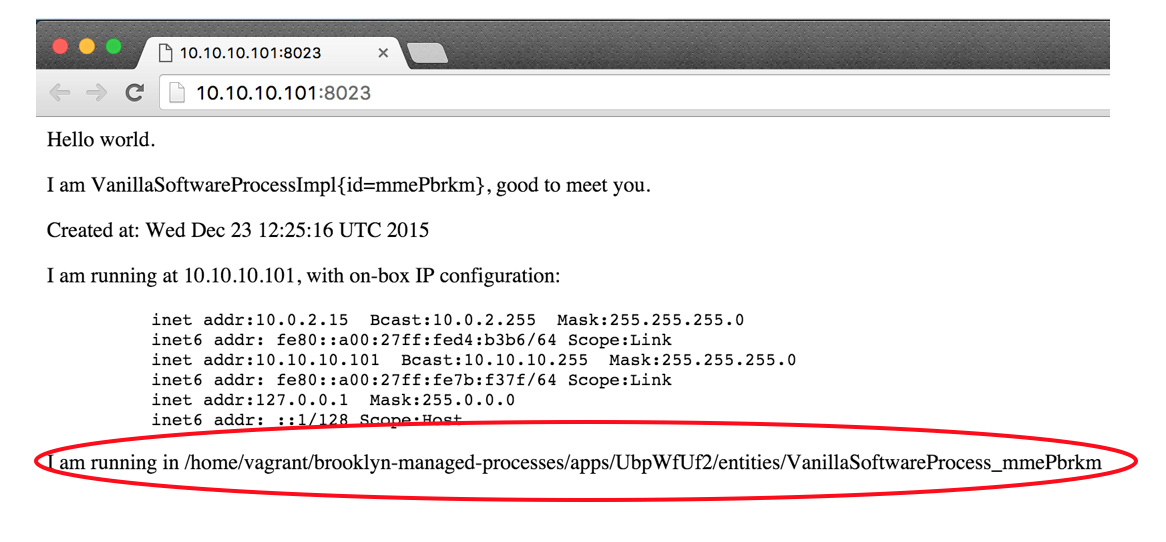
- You should see something similar to this:
Summary
YAML is an easy to understand language. The key elements are:
- Maps
brooklyn.config:
name: "something"
url: "http://example.com"
age: 99
display: true
The key-value pairs must be indented.
- Lists
hosts:
- 10.10.10.101
- 10.10.10.102
- 10.10.10.103
- Values
Quotation marks are recommended for string values. Multi line values can be provided using the | operator:
install.command: |
apt-get update
apt-get install python
curl http://example.com/myapplication > myapplication
Very long values can be written using a more readable multi-line definition using the > operator.
This can be particularly useful when using AMP’s DSL:
url: >
$brooklyn:formatString("http://%s:%s/sample/hello",
$brooklyn:component("tomcat").attributeWhenReady("host.address"),
$brooklyn:component("tomcat").attributeWhenReady("http.port"))
The central section of a Blueprint is the services list. The type of the service is the key point that allows
you to compose blueprints that leverage existing blueprints.
A service implements the AMP config – the key stages being:
- Install
- Customize
- Launch
The quickest way to make blueprints is to use the vanilla software process. This is an entity which allows you to specify an arbitrary shell script for the install, customize and launch phases. It allows you to make an entity out of anything that can be shell scripted.
Next
- Explore more Tutorials